Thursday, January 10, 2013

Update on the sourdough journey

I made a few discoveries over the past year or so experimenting with sourdough recipes in my home oven and thought I'd post a quick update on progress made since my initial somewhat anemic looking loaves.


The most important thing I've learned in this time has been the importance of getting a really high temperature to achieve an appealing red-brown crust. Some of the recipes I've used recommend putting the bread in a cool oven, but I have found that in my oven this generally results in the pale crust seen in my earlier posts.

I'll now generally pre-heat the oven as high as it goes and reduce the heat during the cooking time. At home my small electric oven's highest temperature is 250°C and it has a stone floor under which is a second heating element that can be used to give a kick of heat from below. Although I find the loaves blacken on the base if baked directly on that stone, using the lower heat source with the loaf on a baking tray on its regular shelf has given me the best results.

Most ovens won't have an in-built stone, so you can try pre-heating your oven with an unglazed quarry tile or pizza stone in it to get a similar effect. You'll have to experiment to see if baking directly on that stone works best in your oven or if like me you just use it as a radiating heat source below your tray.

Having a better feel now for when the dough is sufficiently proved has also helped improve the crust colour of my loaves. Recipes I've followed call for an 8-12 hour proving time at around 21°C, but I find this is often too long and results in an exhausted dough with low oven spring and a pale crust.

I've heard that this is due to a younger dough having more sugars from the wheat flour remaining to be used in the Maillard reaction though am not entirely sure if this is accurate. Dan Lepard recommends keeping the final proof in particular on the conservative side with the idea that you'll get a better oven spring.


The final tip is on something I'm still working on and starting to see the importance of – the folding and shaping of the dough. Practice this if you are looking to get a nice bounced spring to your loaf with a rounded base that lifts itself up from the baking sheet when baked and is easy to slash with a lame before baking.

There are many methods to try but they all arrange the dough, through a couple of steps with short rests, into a tighter package than it would have been in had you simply let the dough rise after kneading, tipped the proved dough onto a surface and formed your loaf shape there and then.

For free-standing loaves Dan Lepard has us making a package of the dough during the initial rising time, with what he calls a blanket fold. Dan posts a description of one blanket fold here, and there are variations such as repeating the same fold a few times during the initial rise or performing a double blanket fold in which you blanket fold, quarter-turn the dough and blanket fold again at each step.

On this journey so far I've also tried out all sorts of recipes from Ed Wood's Classic Sourdoughs recipe book including Christmas stollen with marzipan, soft pretzels, hamburger buns, waffles and Ramadan sweet breads. I can heartily recommend the book as a good solid way to get started and be amazed at the huge variety of things you can make at home from your simple starter.


In my own recipe experiments, I adapted a basic white sourdough recipe to include kombu! The idea came from reading about the glutamic acid that is responsible for umami in kombu also being in sourdough, and I wondered if adding the seaweed might produce a really tasty loaf that would be particularly good with other foods. (Interestingly, or so I thought, you'll find kombu in the ingredients list of many packets of salted crisps in Japan. Though it might not be marketed on the front of the pack it is used to improve the flavor.)

Super-umami! Kombu sourdough loaves

I added some roughly chopped shio-kombu to my dough mix before kneading, cutting back on the salt since there is so much salt on the kombu already. The shio-kombu I used contained soy sauce as well, and I found that using just about a teaspoon of it in a 680g loaf produced enough of a kombu accent without the soy sauce flavour taking over.

I plan to make more kombu sourdough loaves to photograph the crumb and write a separate post about it with a recipe.

Wednesday, January 2, 2013

Field Trip! - Cakes and cafes in England

series of posts from visiting interesting little (and large) cafes, food-related establishments and other places of inspiration.

I sampled a few cakes and sweets over the Christmas holidays in the UK. Here are some of the establishments I came across, from the trendy to the traditional.


London sweets trends included big dollops of fruit-flavoured meringue, and salted caramel everything – shortbread, chocolates, toffees. For display, huge plates, cake stands galore and piling up into pyramids were employed more often than refrigeration units.

Ottolenghi in Islington was very cool, and busy, with the communal table in the restaurant area full. The cash register was hidden behind mounds of meringue and cookies and made for a bit of a hectic time for the staff with people ogling food and queuing to pay in the same standing space. Breakfast here is supposed to be good, though we couldn't fight through the crowds.


Nipping into Curzon Soho cinema for a matinee I noticed for the first time that the café (photos below) is catered by the very trendy Konditor and Cook who are currently showing off their mince pies, voted best in Britain by the Telegraph.


Up North things were a bit more old fashioned, with neon-lit chilled glass cabinets more common than in London cafes. Here, as modeled by the Odeon cinema in Manchester's Printworks is how we're familiar seeing our cakes presented, somewhat folornly strip-lit.


Also in the north I visited a small deli café called All Things Nice in Marple that has a formidable cheese counter along with bakery goods, hams, pies and cakes. They have a small cafe seating area at the back of the shop, and do events like wine and cheese tasting.


Finally I wanted to share with you this magnificent dessert trolley as wheeled out at the end of a festive meal in Chester's restaurant in Macclesfield. Complete with wobbly wheels and a slide-out shelf for plating the desserts, this very British piece of restaurant furniture was piled with cheese cake, apple pie, pavlova, carrot cakes, lemon meringue, chocolate cake, trifle, and strawberries. Everything doused in cream on request.


Tuesday, January 1, 2013

Flour tests – Shipton Mill, British flours

While I was in England over the Christmas holidays I took the opportunity to try out some flour from Shipton Mill in Gloucestershire.


There has been a mill on the site of the restored Shipton Mill since at least the 11th Century when it was recorded in the Domesday book. The current owners discovered the mill in 1981 and though it doesn't currently drive the mill stones the wheel does turn and the site can be visited Monday to Friday and Saturday mornings.

At their old mill site and from a larger modern plant they mill a large variety of wheats and specialty grains that are sourced locally and from abroad, and include traditionally stone-ground wholemeal flour. Their activities include promoting the cultivation of rare and old varieties of wheat for benefits to culture, nutrition and heritage rather than being driven only by commercial interest.


When I arrived at my sister's house the package I'd ordered online from their store was already waiting for me. Look how nicely presented it was, it'd make a nice gift for any experimenting bread makers you might know in the UK :)

I ordered their white bread flour made from UK wheat, some stone-milled whole wheat flour, their seed mix containing oats, sunflower seeds, wheat and barley flakes and millet, and a rectangular banneton, since these are quite expensive in Japan.

I wish we had flour like this in Japan! To be fair, I've only used regular Japanese supermarket bread flour so far and so perhaps shouldn't compare yet, but working with flour from Shipton Mill for the first time was a real pleasure. My starter seemed to love it too, being particularly bubbly during culture proof and springy during kneading. The crumb of my basic sourdough loaf was pleasingly off-white and flavoursome, and it toasted marvelously when used for cheese and tuna melts.


I also made a wholewheat loaf with a few handfuls of seed mix folded in during the punching down and shaping stage. This was made to be eaten toasted Christmas morning with the peppered mackerel I had been craving, poached eggs and mugs of tea amongst the torn wrapping paper and excited children. I've stashed the remains of the seed mix in my suitcase for further experimenting back in Japan. I decided against trying to carry packages of white flour in my luggage for obvious reasons ;)


Having a little pretzel dough left over from another Shipton Mill flour experiment, my nephew inspired me to have a go at making one of his favourite snacks, breadsticks. Not having a proper recipe to hand we just rolled them out and let them proof slightly on their baking tray before brushing with a little olive oil and baking in the pre-heating oven until they coloured (about 25 minutes). They got his seal of approval and were fun and quick to make. For more grown-up variations you could roll them in sesame seeds or poppy seeds, sprinkle with rock salt and even pepper.


Monday, December 3, 2012

Marzipan / almond paste in Japan, and a blind tasting test!

Last week I marzipaned the Christmas cake so that there will be time for it, and later on the royal icing, to dry completely before I head off to the UK for Christmas. Exciting!

Marzipan making night

I made the marzipan I used on the Christmas cake from this Delia Smith recipe, which involves whisking egg yolks and sugar using a bain-marie. You can measure the temperature during the 12-minute whisking stage and make sure it either reaches 71°C or is maintained above 60°C for over 3.5 minutes to kill any salmonella that could be in the egg.


Most British recipes for marzipan contain eggs in some form, frequently raw as in the photos below, but if you check the ingredient list of most shop-bought UK marzipan you'll see it does not.


Indeed, in Germany where they have refined marzipan making to a national craft, eggs appear only rarely to be used. Many eggless recipes involve heating water and sugar, and sometimes glucose to a specific temperature and pouring the hot syrup onto the ground nuts.

Heated to 118C, this syrup became clear and bubbly

I was interested to learn that there are specific legal requirements that need to be met in Germany to be able to call a product marzipan, including that it consists of at least 50% almond paste (marzipanrohmasse) which in itself can consist of only almonds, sugar and water and/or rose water.

The names 'marzipan' and 'almond paste' are often used interchangeably outside Germany, but it's probably helpful to think of almond paste as being a base for making the regular cake-covering/modeling marzipan (add more sugar). Almond paste is also used in baking and for making confections. Here is a breakdown of some of the different classifications of marzipan used in Germany.

Anyway back to the homemade stuff - I wanted to see what discernable differences there are between types of marzipan with/without eggs, cooked vs. raw, almonds vs *other nuts!* and so embarked upon a big making session followed by a blind tasting.

Serious stuff, this!

I subjected my partner, who didn't complain too much, to a taste test before work one morning. We tried out the following marzipans:

A - Shop-bought in France, just before its best before date. A 'control', if you will.
B- Delia Smith's, a cooked version (if you measure the temperature to 71°C) with eggs.
C- Cottage Smallholder recipe, raw with eggs.
D- Dan Lepard's Pecan marzipan (but made with walnuts, for lack of pecans), cooked with eggs.
E- Peter Greweling's eggless recipe, but made with hazelnuts, cooked.
F- BBC Good Food's zesty orange marzipan, raw with eggs.


Our verdict was that out of the homemade versions, the Delia 'cooked' version had a texture that was closest to shop-bought marzipan, as it was drier and finer-grained. All of the raw marzipans were comparably wet and sticky, which was a lovely feature when used inside stollen, but could be challenging to roll out to cover a cake - I'd recommend being prepared to use a little more almond powder and sugar in either C or F recipes to combat that (particularly F).


The non-almond versions were lovely, especially the Dan Lepard version, D although I don't understand why both the glucose and the glycerine were necessary. Either way I'm now going to have to get more nuts to try the pecan version - maybe with bourbon. I'm also curious to have a go at something with just/mainly honey and almonds to see how that tastes and behaves.


D was a little crumblier in texture but I think that was more to do with the ground walnuts (done in a blender) being less uniform than the pre-ground almond powder I used for many of the other recipes. There is so much scope for variation - cardamon-flavoured Iranian toot, pistachio marzipan, cinnamon and other spices, pine nuts and perhaps trying something like one of my absolute favourite nut paste treats turron de jijona.

I also tried baking the marzipan to see if any of the different versions would melt away, and none did. It all browned quite quickly in a hot oven, and A and E (eggless) remained wetter inside compared with the other versions. Delia marzipan (B) was the firmest on baking and reminded me of the texture of white anko paste.. I'd say the Delia recipe is best eaten cold/used to cover cakes.


I now have a ton of marzipan :) Aside from covering the Christmas cake I'm experimenting using the different flavours to stuff my stollen loaves, using some to as alternative mince pie lids, and having slices of the walnut one in particular with glasses of sherry. Cheers!

If you're not interested in having a go at making your own, you can buy marzipan online in Japan from quite a few places as it turns out, starting with here and here. It’s most commonly called マジパン / majipan, which usually refers to the high sugar content type of regular marzipan we're all familiar with that's good for covering cakes (at least 50% sugar). Even if you are making your own you might still find it more economical to order your ground almonds and powdered sugar online too (Nissin supermarket almond powder is 980 yen for 350g and you can pay just slightly over 1,000 yen for about 1kg online).

You'll find almond paste / marzipanrohmasse referred to as マジパンローマッセ / majipan rohmasse or ローマジパン / roh majipan / raw marzipan. Both of these names refer to the higher nut-to-sugar ratio almond paste (2:1 nuts to sugar, with up to 35% sugar). Incidentally you can get the real thing - Lübecker marzipanrohmasse in Japan too, I'm definitely going to have to check some of that out!

The history of marzipan and its etymology are contested and fascinating. The tradition of kneading ground nuts with a binding agent such as honey goes back at least as far as 1800 BC Egypt, but the particular almond and sugar incarnation is claimed to be originally Iranian, or Chinese, Spanish, possibly Italian... There are stories in Arabian Nights of marzipan being used during Ramadan and of it being an aphrodisiac, and of it being transported to Europe by crusaders. Other origin stories involve resourceful Toledo nuns, inventive French cooks, and a day-dreaming Venetian baker's daughter making a mistake with a recipe. It was supposed to have been used as a palate cleanser at medieval banquets, in times when sugar and almonds were expensive it was a gift fit for royalty, then in the 18th century Germany it was given as a christening present.
Today the taste of marzipan appears to divide people almost as much as does coriander.

The unusual name is variously explained as coming from March bread, St. Marc's bread, little box, the king who sits still ..! To quote from the online etymology dictionary:
"marzipan (n.) 1901 (in modern use; earlier march payne, late 15c., from French or Dutch), from Ger. Marzipan, from It. marzapane "candy box," from M.L. matapanus "small box," earlier, "coin bearing image of seated Christ" (altered in Italian by folk etymology as though from L. Marci panis "bread of Mark"), of uncertain origin. One suggestion is that this is from Arabic mawthaban "king who sits still." Nobody seems to quite accept this, but nobody has a better idea. The Medieval Latin word also is the source of Sp. marzapan, Fr. massepain."


Monday, November 26, 2012

Bramley apple pie - pre-cooked filling vs. apple slices filling

Apple pie is my favourite thing to make (and eat) with Bramley apples (this link includes updated information on how to get them in Japan), with a crumbly double pie-crust made with simple all-butter shortcrust pastry, or a rich sweet shortcrust pastry. As I rave about excitedly in my first Bramleys in Japan post, British style apple pie made with Bramley cooking apples is tarter than American apple pie, and the apples end up as more of a fluffy puree rather than clearly defined slices. It is the taste from the tree in my childhood house.

Pre-cooked filling on left, apple slice filling on right

Working from a basic recipe you can add all kinds of things to the filling (sultanas, nuts, cinnamon  cloves, a splash or steeping of a choice alcohol, lemon or orange zest, some flour or cornflour if you find your apples produce too much juice, caramel sauce, marzipan..) and/or to the pastry itself (ground almonds or hazelnuts, cheddar cheese, a little baking powder, spices...). Depending on the type of dish you use, the nature of your oven and how you want your pie too look, you will also be able to change the amount of ingredients, cooking times, and temperatures.

To get started with a basic recipe, you’ll need roughly 500g of shortcrust pastry and 700g of Bramley apples (about 2 large ones) for a 22 cm pie dish. I used about 500g of apples for each of the 18 cm shallow-dish pies in this post.

Sweet shortcrust pastry (about 500g)
  • 275g flour
  • 175g chilled butter, diced
  • Pinch of salt
  • 25g sugar
  • 1 egg, beaten
  • 2 tablespoons of cold water

Pie filling
  • About 700g of Bramley apples for a 22cm pie dish
  • Squeeze of lemon juice
  • Between 0 - 100g of sugar, depending how tart your apples/sweet your tooth
  • 25g of butter, diced
  • Any additional ingredients of your choosing (spices, nuts etc..)

For the pastry, sift the flour and salt and rub the cold butter into flour briefly, until there are no very large lumps of butter left, stir in the sugar. Mix in the beaten egg and cold water with a round bladed knife and bring the dough together into a flat disc with your hands. Wrap in plastic and chill for at least 30 minutes, bringing it out of the fridge again 15 mins or so before you need to roll it out so that it's still cold but not solid to roll. Top tip! - if the sweet pastry misbehaves when rolling, try rolling it between two lightly floured sheets of plastic wrap, peeling them away carefully when you line the pie dish. Prick the base with a fork, scatter with ground almonds (optional) and leave the pastry hanging over the edge until you place the lid.


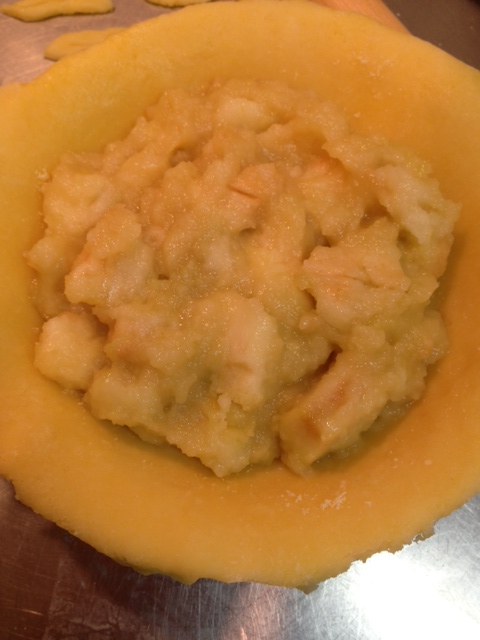
For the filling you can either peel and core the apples, cut them into chunks and -
a) heat them through in a saucepan with the lemon juice, sugar and butter until they start to soften into a puree to use in the filling (some chunks of apple left in the puree are fine, and desirable.) Be sure to let your puree cool completely before using so that you don’t prematurely melt the butter in the bottom crust of the pie (1st photo), or you can -
b) toss them in some lemon juice and sugar and pile them in the pastry-lined pie dish as raw chunks with little bits of butter dotted over them before putting the pastry lid on the pie (2nd photo).


With your preferred filling in place, wet around the edges of the bottom crust and lift your lid on top. Cut a couple of slits or holes for air vents and press down gently around the edge of the lid to secure it and push out the air. Hold your dish like a waiter with a tray, and slice off the over-hanging crust (if you love lots of crust, you could instead fold the lid and overhang under itself, a bit more American-style pie maybe? Nice link here on American-style crimping and tips on lattice top pies too).


Crimp edges or press down around the edge with a fork to make a pattern, and decorate to your heart's content with the pastry trimmings - my favourite part when I was little. You can freeze/chill the pie at this point for later baking, or brush the finished pie with milk (which I prefer) or egg wash (as used in these examples), sprinkle with sugar and bake. My little pies for this post took 25 minutes at 190°C, a 22 cm pie will probably be closer to 40 minutes.


If you are using the raw fruit method in particular, you will need to use quite a hot oven temperature (190-220°C) to get the pieces of fruit to go soft inside the pie. Be ready with some foil to drape over the top of the pie (or fold loosely around the edges of the pie) if you notice the pastry browning too quickly on top - this is a particular problem with small ovens used in Japan, as your pie will take up most of the space in the oven and be quite close to the oven roof.

No, these aren't the ideal dishes for baking pie...

The differences between the two methods of preparing the filling are that the pre-cooked filling (on the left) is a flatter pie with a more dense and jammy filling, whereas the raw fruit method (on the right-side) gives a more dome-like shape, often with pockets of space under the top crust of the pie as the Bramley apple pieces mush somewhat during baking and reduce in size. It makes for a rustic, bobbly appearance to the lid of the pie, and probably also helps to prevent soggy-bottomed pastry, as the filling only becomes wet with juice after the pastry base already has had time to bake.


Heating up the baking tray in advance in a hot 220°C or so oven, ahead of reducing the temperature to your normal baking temperature, will also help to cook the bottom crust properly for either filling method. Using an enamel pie dish will also help you get a good bake on the base, and if you use a glass dish you'll be able to see at any point how well the base is doing.

If you have pastry left over you could make jam tarts or mince pies! (Which is another fine use for Bramleys...)

Mini mince pies with homemade Christmas mincemeat filling

Making up a double batch of the sweet shortcrust pastry isn't a bad idea as it keeps for a 3 days in the fridge, and freezes well for up to 3 months.

--
Here are a few good alternative pastry recipes that work well with apple pie:

Classic plain shortcrust, half fat to flour, no sugar. Good photos:
http://www.deliaonline.com/how-to-cook/baking/how-to-make-shortcrust-pastry.html
Sweet shortcrust made with icing sugar, butter, eggs and milk: 
http://www.jamieoliver.com/recipes/pastry-cake/old-fashioned-sweet-shortcrust-pastry
French-style sweet pastry made with the creaming method:
http://www.bbc.co.uk/food/recipes/pate_sucree_39572
Cheddar cheese crust apple pie recipe from Delia Smith:

Thursday, November 15, 2012

Start-up costs for a small bakery/café in Tokyo

I came across an interesting series of articles in Japanese magazine Café Sweets which introduced 3 recently opened cafes in Japan and listed their start-up costs and average sales per customer and so on.


Here is the information from the images above:
  • 8-seater café in Meguro-ku with 2 staff, took 15,000,000 JPY in start-up costs (about $185,000 / £119,000). Monthly sales goal of 2,000,000 JPY ($25,000/£16,000), with current estimated sales at 680,000 JPY ($8,500/£5,300). 
  • Café with 20-seats in Setagaya-ku, 4 staff. 10,000,000 JPY cost at start-up ($125,000/ £79,000). Monthly sales goal 1,800,000 JPY ($22,600/£14,000), current estimated sales of 1,512,000 JPY ($19,000/£12,000). 
  • Café in Ishikawa prefecture with 28-seats and 2 staff took 8,000,000 JPY to get started ($100,000/ £63,000). No monthly goal stated, but current estimated sales of 600,000 JPY ($7,500/£4,700). 

Although it appears quite possible to spend 15 million yen and more to set up a small cafe, I've spoken to business owners in Tokyo who have spent much less than even the lowest start-up cost of 8-million yen listed here, so it is possible to do it more cheaply than these articles suggest. It also occurred to me that it might be in the magazine's best interest to talk up the costs slightly to be responsible and encourage sufficient planning.

The shop rent and real estate fees aren't stated explicitly in the magazine's break-down, but all 3 examples took between 1.3 - 2-million yen to acquire the spaces which we can assume includes rent, deposit, agent's fee etc. The business owners in the article spent 49 - 72% of their start-up funds on reforming the space and fitting the kitchen, and so doing up the space is definitely an area you could focus on to try to reduce initial costs. Perhaps you can break down the old space yourself, keep the new design simple to start with, buy some of the non-critical equipment and furnishings second hand, search hard for space reform contractors who can give you a great deal, and look into recently closed 'going concern' / 居抜 / inuki spaces that still have kitchens and some of the items you might need in place.

The small café based in Meguro-ku in particular looks to have some challenges ahead, just based on the figures - with a stated goal of 2-million a month in sales, and an average sales price of 900 yen per person, they are going to have to make themselves available to and able to serve over 2,200 customers a month instead of their current 755, either that or increase the average sales price, or cut costs to allow for a lower monthly goal. Gosh. It appears to be part of a larger chain of coffee shops however, so perhaps there is financial support from the parent company during the initial stages.

By way of comparison, here is an article from New York magazine a few years ago telling the stories and listing the costs involved in setting up a bakery, restaurant, or wine bar in New York. Even accounting for inflation, the start-up costs for Babycakes in New York were considerably lower than those published in the Tokyo magazine:

Babycakes NYC startup costs (recalculated to 2012, considering US inflation)
  • Total Start-Up Costs= $43,600 (about £27,000/3,490,000 JPY) Rough Monthly Expenses= $13,300 (about £8,300), including rent of $3,200 a month. 
Despite the NYmag article painting the owner Erin as perhaps not best-prepared shortly after the business had opened (not having enough start-up money, paying staff in cash, a tight business model with low margins...) it looks like things worked out great for Babycakes, the business seems to be going strong 6 years later - http://www.babycakesnyc.com/


Wednesday, November 14, 2012

Might your ward office help you set up your small business in Tokyo?

Just a short and sweet post today, to get the word out in English that many ward offices in Tokyo have various support services for small and medium-sized businesses that are based in their jurisdiction. Even the helpful chaps at Tokyo Business Entry Point neglected to mention that such services are available and so I thought people might like to know.

In the case of Minato-ku small business support services include free ‘business advisor’ consultation to do things such as go over your business plan, low interest loans for new businesses, rent subsidies, incentive grants to companies to encourage the use of parental leave, subsidies towards setting up or improving your website etc. (All above links in Japanese.)

It’s certainly worth having a look for information on services offered by your own ward office, as each area offers varying support each with their own deadlines for application.

You’ll probably need to look in Japanese, and could start with Googling the name of your ward (Minato ku, Setagaya ku) + 中小企業 支援 / chuushokigyou shien / small medium business support, or the name of your ward + 融資あっせん制度 / yuushi assen seido / financial assistance system. Note that the ward office in question will need to be that of your business address and not your home address, if the two are different.

Good luck, and I hope this information helps someone realise their plans!