Showing posts with label Winter. Show all posts

Monday, March 17, 2014

Make your own candied peel

Candied peel is an ingredient that pops up a lot in winter and springtime British recipes - from Christmas cakes to hot cross buns. It can also be quite expensive to buy in the shops, and difficult to come by in most places in Japan, so it's definitely something I wanted on the handy "make your own..." list. Most of all I just really like the idea of a nose-to-tail style of no-waste baking. Let's have more of that please!


I made this batch on one of the recent snowy Tokyo days with a view to using them in hot cross buns coming up in April. Here is the method I used.

Candied orange peel - Ingredients
  • 3 large oranges (you could do this with other citrus fruits too)
  • 200 ml water (plus extra for initial boiling stages)
  • 450g sugar, and extra caster sugar to dust 

Method

First peel your oranges. I used just 3 large oranges for quite a lot (300g+) of peel. If you cut off the ends and score lines down the sides of the oranges then you get nice shaped pieces to work with.


How thin you want to slice depends whether you will use them for decoration or for chopping up and going into bread or cake batters. Mine is the latter and so I went quite chunky.


Put the peels in a saucepan, cover with water and bring to the boil twice, discarding the hot water each time.


Next, measure the recipe's sugar and water into the pan and then bring to a simmer.


Add the peels and return to a simmer.


Heat like this for about 1 hour or until translucent and then drain off the syrup.


Dry the slices separately as much as possible, so they don't stick together.


I found that dredging with sugar worked best after the slices were cold and somewhat dry already. If you dredge too soon, the sugar melts in a thick layer on the peel, but what you want to see, is granules of unmelted sugar, coating the peel.


Eat a couple as they are, dip some in dark chocolate as very sugary snacks, or store in a ziplock bag for when you make your hot cross buns.

These peels should keep very well at room temperature for a few weeks, some people manage to store them for months if they have been well saturated with syrup in the boiling stage, dried very well before storage and then stored in an airtight container. Until I have better evidence to the contrary I would say that if you are planning to use them more than a month later, like me, then freeze them to be on the safe side, as they can go moldy.


Saturday, February 8, 2014

Oranges project - marmalade, candied slices and caramelised segments

I had a beautiful big bag of oranges and a plan to make candied peel (recipe to follow soon) for hot cross buns coming up in April. This would use just the skins of just 3, and so I looked around for some other exciting things to do with the remaining fruit. The result was a bit of an 'orange project day' in the kitchen, producing marmalade, candied orange peel and slices, and caramelised orange segments. All that hot syrup and bright fruit is the perfect way to warm yourself up on a chilly February day!


Firstly, Lily Vanilli's Sweet Tooth book has a a lovely and simple way to use up the orange segments left over from making candied peel. After removing the segments one by one from the peeled orange, you melt sugar in a pan to make caramel and stop it with juice from the fruit.


Stir in the segments once the caramel is cool. We tried them with yoghurt honey and granola and they were lovely.


Next up was the marmalade. I used Dan Lepard's excellent recipe although my oranges were not the bitter Seville variety called for to make a proper marmalade. I wonder if we can get bitter oranges in Tokyo? Surely we can..!


Soaking the orange slices overnight

This recipe involved soaking the squeezed and sliced oranges in their juice plus water. I was supposed to soak the pips separately in a cup of water, but my oranges had no pips! Or I should say, the pips were so tiny as to be insignificant. Still, there was no problem with the mixture setting at the end and so it didn't appear to be a problem.


Dan has us boiling the slices for 2-3 hours without the sugar until the peels are soft and squishy. Once the sugar (white, and 2 teaspoons of brown sugar) and lemon juice are added, the mixture boils up considerably and the consistency changes from watery to syrupy as the water boils off and the amount of sugar in the mixture is concentrated.


We're supposed to boil the marmalade until it reaches 105C, let it cool slightly and then transfer to sterilised jars. I quite liked this non-bitter orange version of marmalade, there was a little bit of pleasing bitterness to it still, perhaps from the pith. Lovely on toast!


Finally another Vanilli recipe to use up the remainder of the oranges, candied slices. You prepare a simple syrup of water (300ml) and sugar (125g) and boil the fruit in it until they start to become translucent. This took about 1 hour. For French-style fully candied fruit that is hard and has a long shelf-life, you would need to boil them over a number of days to replace all of the water content with super-saturated syrup. These are a little more delicate, still being quite soft, and they would look smashing on chocolate cake or on top of an orange-drizzle cake.


There we go, a a bit of a nose-to-tail day of cooking with oranges, and an awful lot of sugar!

Now I fancy having a go at the hot marmalade pudding from the Hawksmoor cook book, or perhaps this one. Sounds very wintery and special, especially with a boozy sauce.


Sunday, December 15, 2013

Sugar poinsettias - Getting ready for Christmas


I've been indulging my crafty side recently having fun working on some basic gum paste techniques. The color scheme for my sister's wedding next year is purple and white so I've been practicing various flowers and things for the corsage-type decorations for the cake - but more on that next year I'm sure..!


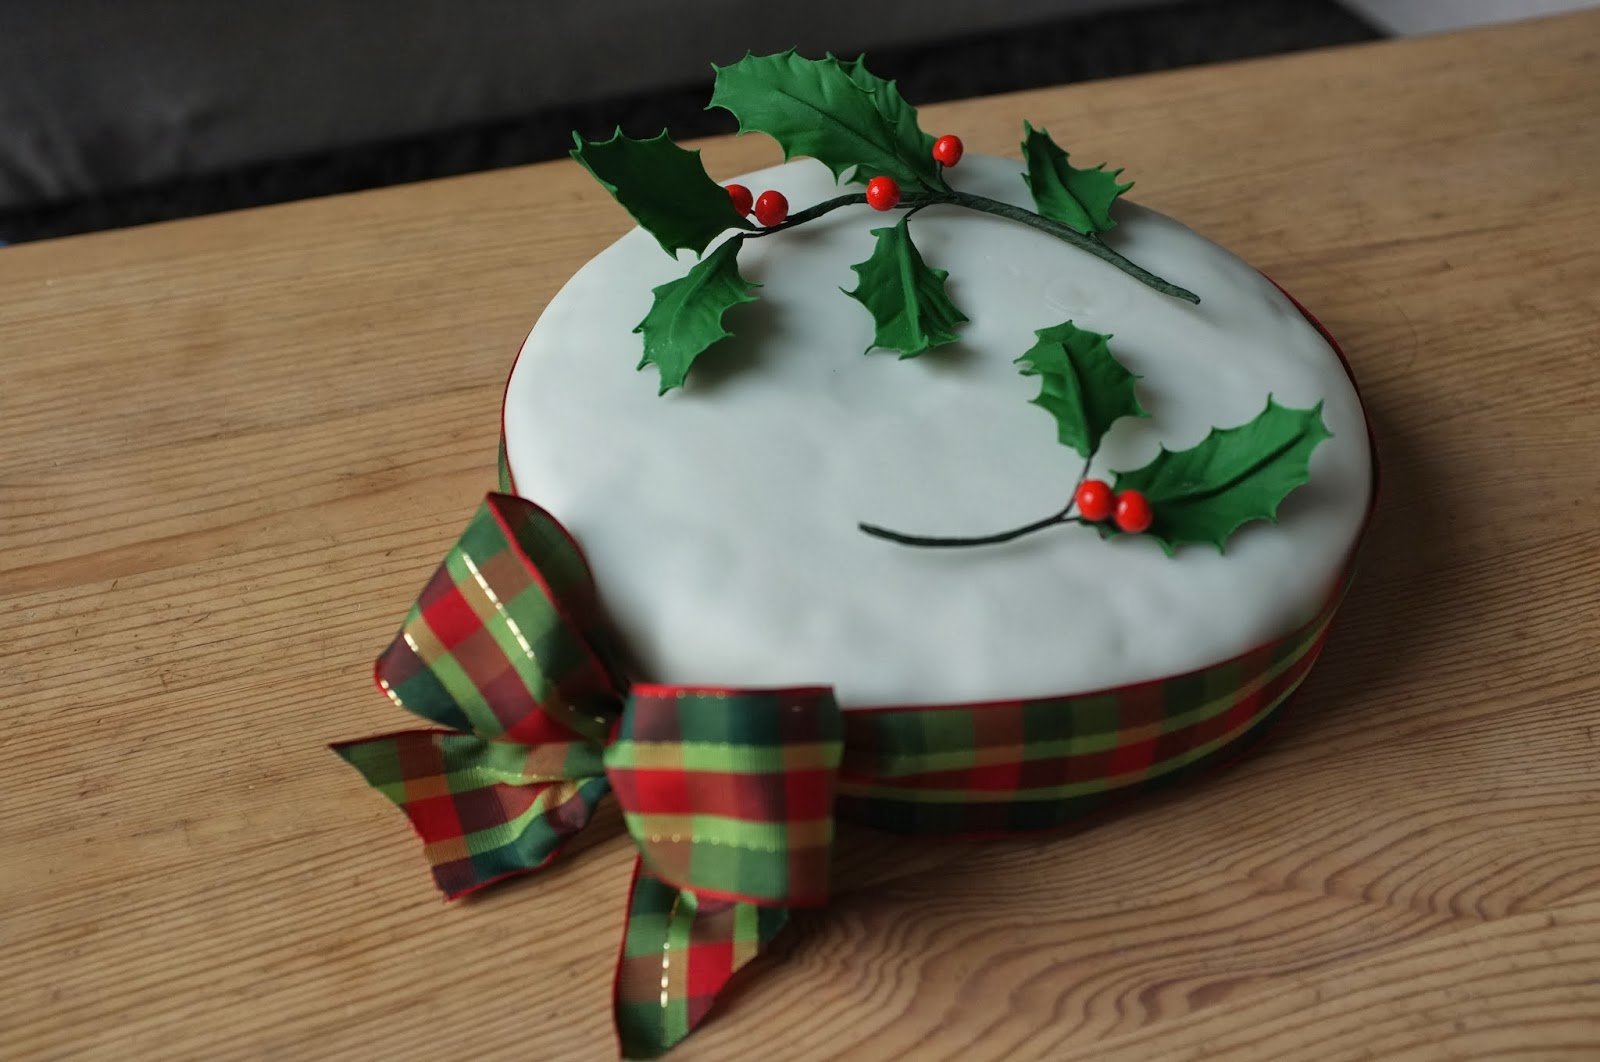
Since I've been doing taste tests with coverings for traditional British Christmas cakes I thought I'd have a go at something a bit more seasonal as well and went for the red Christmas 'flowers' Poinsettias - the red things are leaves, but more on that in a moment - and some holly.


I'm undecided whether I prefer a simple decoration of something like holly on a flat surface, just the traditional spiky snow scene with a ribbon and no gum paste decorations at all, or a very over the top and showy poinsettia decked out in ribbons. I'm slightly embarrassed by how fun it was trying them all out.

The traditional royal icing snow scene


If you go to a Wilton shop you can get all kinds of handy tools and cutters to make leaf and petal shapes for various flowers and mats to imprint leaf textures etc. Poinsettias however appear to need to be made free-hand - unless you order a set from abroad. I relished the challenge, and had a go.

This is my first attempt, the leaves of which could probably be made a little finer and would benefit from some dark dusting powder to show the textures better. I assembled the red bracts in much the same way you would make a lily petal, folding the little flap over each wire, and then cutting them freehand with scissors.


Designing this reminded me how weird and amazing plants are. Earlier we covered the fact the red bits aren't actually flowers, but have you ever had a good look at the centre of one of these plants? There are crazy things going on in there! When poinsettias are depicted on fabric or in a drawing, there are often just a couple of yellow or gold circles in the center, but on the real plant there are actually intricate little flowers, or "cyathia" there in green, red and yellow. Though strange, my representation in sugar doesn't even do full justice to the wonderfully bizarre arrangement of the actual plant.


The spiny leaves of the holly were created using lily cutters and then a small round cutter to remove semicircles from around the edge. I put a dot of clear varnish on top of the berries so they would shine. Since these displays are for placing on cakes that are for eating, all the wires need to be wrapped in floral tape so that the metal doesn't touch the cake. Note that if you have a large display that you want to anchor into the cake, you should insert your wrapped stems into a plastic flower spike that you push into the cake.


There is, of course, an inherent strangeness to this kind of sugar craft. You go to all the trouble to make something delicate out of sugar, only to include wires and make it inedible.. It is a conundrum, but they are not completely redundant as aside from being quite impressive when made well, they don't wilt as would fresh flowers, and since they are made for special occasions, they can be kept indefinitely as a memento of the occasion if you're careful with them.

It is also possible to make simpler gum paste decorations that contain no wires and would be completely edible, albeit crunchy. You would need to mount them on a gum paste base to set them on the cake, or glue them directly to the cake with edible glue. Similarly, if you make simple decorations using fondant or marzipan, they would be completely edible too.

Oh and yes, all these decorations travelled with me to the UK too, carefully wrapped in tissue in a box in my hand luggage this time. No problems at security for these or the oh, 100 or so macaron shells packed along side them - "you do macarons don't you?" says my sister, the bride to be, "this 10-layer tower I've seen looks great!" (Next year I'll need to take more than 100 macarons..) The Christmas sugar decorations survived the journey quite well, with just a couple of the spiky tips falling casualty along the way.

Sunday, December 8, 2013

Royal icing vs. rolled fondant - Getting ready for Christmas

Traditionally speaking, British Christmas cakes and wedding cakes are heavy, rich fruit cakes that are made weeks or months in advance of the date they are needed, matured and 'fed' regularly with brandy, then covered in a 3 mm or so layer of marzipan and finished off with a hard, white layer of royal icing.


These days if you search online for information about royal icing, you're more likely to find yourself on sites discussing decorating cookies, or perhaps creating lasting decorations. The Wilton site even goes as far as to recommend royal icing is not used as a cake covering. Certainly, the sometimes impractically hard covering created by royal icing would be a strange match for a butter cake or chocolate cake, but I do think it has a place still for fruit cakes.

This year, partly as preparation for making my sister's wedding cake (congrats!) next year, and partly to do the kind of side-by-side taste test I love so much, I made a few Christmas cakes for a rolled fondant vs. royal icing showdown.


Fondant is extremely easy to work with - it stores well if you don't use all of it at once, is easy to cut slices of once it's on a cake, and you can get creative with colours and make all kinds of decorations. The downside for me is that, depending what brand you use, there are a bunch of things in there I wouldn't usually choose to eat, like shortening, thickening agents, emulsifiers, preservatives etc. I have also seen recipes for home-made fondants that include stabilised cream and butter rather than shortening, but I wonder how they would hold up under heat.. more experiments ahead!

Royal icing by contrast is traditionally made with just egg whites and powdered sugar. Some recipes also include the additive of food-grade glycerine (a sugar alcohol) to stop it from drying too hard, others add lemon juice. Many modern British recipes suggest using powdered egg white, or pasturised egg whites instead of raw, to remove any risk of salmonella.

Smooth, but slightly pocked royal icing surface

Slightly bobbly surface of rolled fondant icing

Royal icing can create sharper lines on your cake than fondant, it's also a brighter white than most types of fondant and can hide the lumps and bumps of the fruit cake better, though there are ways to improve the bobbly appearance even when working in fondant. A downside to royal icing as a fruit cake covering is that it's not easy to get a neat cut - even with glycerine it dries very hard! The layer of icing frequently cracks as you cut into the cake, and shatters either side of the knife as you cut down.


Considering its use in traditional wedding cakes, and the common ritual cutting of the cake together, this is a fairly big consideration - you don't want the happy couple giving the impression they can't achieve things together by failing to cut into the cake :) I've found that using glycerine, whipping up the icing to stiff peaks and building the icing up in thin layers on the cake, smoothing and sanding between each layer creates a more powdery (rather than concrete!) covering that a sharp, thin knife can handle relatively easily. I'm still experimenting here.


Having cut these cakes in half I wrapped them up, sealed them in a cake tin and stowed them in my check-in luggage. In preparation for the wedding I also need to discover how well these coverings travel. Indeed, and whether the purported similarity of fondant to Semtex means my case arrives in the UK at all.. :) I'm currently on the plane and shall report back. (Edit: travel success! They both arrived in good condition and were not exploded by airport security.)


In these tests, for elegance and taste the royal icing won hands down but the fondant being easy and practical means it has a lot going for it. I kinda hope my sis choses the royal icing for her wedding cake, but we'll see..!

Monday, November 25, 2013

This year's mincemeat - getting ready for Christmas

Just a quick post to remind any ambitious parties who are planning to embark upon making their own Christmas puddings, mincemeat or Christmas cake, stir-up-Sunday was just this weekend and it is perfect timing to get stuck-in and make your house smell like Christmas.


I wonder how much mincemeat I’ll be making this time next year? I’m so excited about getting started with the business I can barely concentrate on all the (still many, many) tasks at hand in order to start... This year I made a modest amount just for gifts, samples, and I’m reserving a special 400g of it to take back to my family in the UK in a couple of weeks time, to bake mince pies “for Father Christmas” with my niece and nephews.

I made this particular mincemeat with butter instead of the traditional suet, as suet suitable for baking is hard to come by in Japan and I wanted to see if I minded the non-traditional version. I’m pleased to report that I don’t mind at all! It is really lovely. Of course it also means that my vegetarian friends can enjoy the mincepies too.


Here is the recipe I used, adapted from Delia Smith and Mary Berry's recipes.

Ingredients:
  • 225g Bramley apples cored and chopped
  • 175g raisins
  • 110g sultanas
  • 110g currants
  • 25 chopped almonds
  • 110g butter
  • zest and juice 1 lemon
  • zest and juice 1 orange
  • 175g brown sugar
  • 60g dried apricots, chopped
  • 50g candied lemon peel
  • 60g candied orange peel
  • 1 teaspoon mixed spice
  • 1/2 teaspoon cinnamon
  • pinch of salt
  • 4 tablespoons of brandy (or preferred amount to taste)

Method:
  1. Combine all ingredients in a large pan and heat gently to melt the butter and sugar. Continue to heat through very gently for 10 minutes, stiring occasionally and leave to cool.
  2. Once cool, add your preferred amount of brandy and decant into sterilised jars. 
  3. Store the mincemeat in a cool dark place while the flavours develop further until you need it at Christmas.
Note that if you are using glass jars with metal lids, it's best to put a piece of plastic wrap between the lid and the jar to avoid any reaction between the lid and the acidic contents of the jar. 

The best thing about making your own mincemeat is that you can adapt the mix of dried fruit to your own tastes – just keep the total weight of dried fruit roughly the same as your recipe. Many recent recipes add cranberries, I like to add dried apricots, as I think they go fantastically with the almonds and brandy.

If you've also made your own British mixed spice and customised your blend of spices to your preference, then you’ll have a totally unique mincemeat of your own!

Wednesday, March 20, 2013

Make your own 'mixed spice' for British baking

Many British winter baking recipes (Yorkshire parkin, mince pies, Christmas cake, bread and butter pudding..), and a few spring ones (Welsh cakes, some hot cross bun recipes..) call for a mysteriously imprecise ingredient named 'mixed spice'. This is a particularly British mix, which is different to 'allspice' and different again to '5 spice'. How confusing. It has a warm, exotic fragrance, redolent of Christmas and mulled wine. It seems that no Japanese supermarkets sell the particular British blend. Why would they?

Cinnamon, coriander, allspice, ginger, nutmeg and cloves.

What is a Brit away from home, hankering for sticky toffee pudding recipe that calls for mixed spice to do? Well, you could do worse than buying a jar of American pumpkin pie spice, more readily available in Japan - the 4 ingredients found in most pumpkin pie spice blends are also the base of the British mixed spice - cinnamon, ginger, nutmeg and cloves.

Or you can make your own! This also has the benefit of you being able to alter the amounts of the spices in the mix to suit your personal preferences, and will make your dishes a bit more uniquely yours.

For about 4 teaspoons worth of mixed spice, enough for just a couple of bakes:
  • 1 tsp cinnamon powder
  • 1 tsp ground coriander
  • About 3/4 tsp ground nutmeg
  • 1/2 tsp ginger powder
  • 1/2 tsp allspice powder
  • 1/4 tsp ground cloves
You could also add some ground caraway seeds, a little powdered mace, a ground cardamon pod, ground fenugreek, maybe a little white pepper. Cloves and mace are quite strong and can dominate the mix if you use too much, if you're increasing the amount of either of these go slowly and add a bit at a time.

Mixed spice mountains

Make as much or as little as you like using a baker's percentage-like calculation where instead of flour, the cinnamon is used as the 100% base to calculate the amounts of the other ingredients:
  • 100% cinnamon powder
  • 100% ground coriander
  • 80% ground nutmeg
  • 50% ginger powder
  • 50% allspice powder
  • 25% ground cloves

Which, for about 40g of mixed spice (8-16 bakes) would be:
  • 10g cinnamon powder
  • 10g ground coriander
  • 8g ground nutmeg
  • 5g ginger powder
  • 5g allspice powder
  • 2.5g ground cloves

The resulting mix might be a little milder than the version you can buy ready-mixed at supermarkets in the UK, so see how it goes in your baking and use a little more than your recipes suggest if you find it is too delicate.

Ground spices don't keep potent for very long either - make sure your newly mixed spice is kept in a cool dark place and stored in an air-tight container like a clean old jam jar. Store for about 6 months and make a new batch after that.

That's clove powder masquerading as a jar olives on the left

If you want to buy your spices in bulk for less than they'd cost you at an international supermarket, try Spice Home behind Roppongi Hills, near Cafe 8, there is also Jasmine mini market near the tennis courts in Moto Azabu, or make a trip to Hyakunincho, just outside Shin Okubo station, which is becoming a veritable Little India of spice shops.

The next level of dedication to British baking might have you grating whole nutmeg nuts and grinding your own coriander seeds etc. For now though, this should be a quick enough fix to solve your hot cross bun craving.

Thursday, January 31, 2013

Steam vs. bake - The sticky toffee pudding trials

Sticky toffee pudding, known in some countries as sticky date pudding, is another classic British comfort food like jam roly-poly that reminds me of school dinners (which is what we call school lunch in the North of England). It’s traditionally steamed in a pudding bowl, but is more like a cake than a pudding. Certainly it is more like a cake than Japanese プリン / pudding. Made with the dried fruit, nuts and wintery spices like cloves, served hot with a warm caramel toffee sauce poured over - it might look a bit inelegant but it’s shockingly good.


It isn't unusual for people to huddle possessively over their bowl until it’s finished. It was just such a reaction from a friend I had eventually made the pudding for that produced one of the first inklings that I might have a chance at making my little business idea work - She was so profoundly happy to taste it again after years living in Japan.

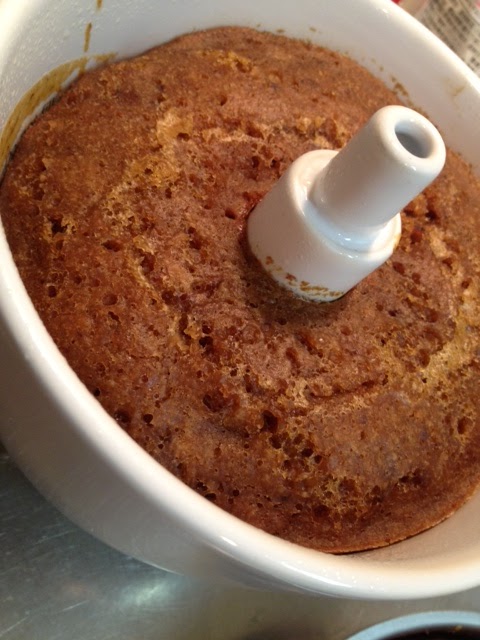
Though the pudding was traditionally steamed, most recipes you find today are for baking it. I was curious to see if there would be much difference to the end result between steaming and baking the sticky toffee pudding, and to see which would be better. If the steaming is good, I also thought to myself, then it means this is one traditional British dessert that can even be made in those Japanese kitchens that don't have an oven!

Sticky toffee pudding steamed in a pudding basin

The same sticky toffee pudding recipe baked in the oven

I used exactly the same recipe for each pudding, adapted from Felicity Cloake's in-depth investigations into some of the most well known versions.

This amount in the recipe made enough to divide between my 600ml pudding basin and a 14cm heart-shaped cake tin.
If you're only going to be baking then Felicity suggests a 24cm x 24cm square baking dish.
If you're only steaming then either do 2 smallish puddings in 500ml capacity basins or use one large 1-1.5 litre basin and adjust steaming times accordingly. If you don't have a pudding bowl any good solid, deep and heatproof bowl with a rim around the top to help keep the string in place will do.

Ingredients for the sponge:
  • 175g dates, stoned and barely chopped (I like chunks of date in the pudding)
  • 1 tsp bicarbonate of soda
  • 200ml boiling water
  • 100ml brandy (or just use 300ml boiling water/weak tea)
  • 50g unsalted butter, softened
  • 80g light brown sugar
  • 80g dark brown sugar
  • 2 eggs, beaten
  • 1/2 tsp vanilla essence
  • 175g plain flour
  • 1 tsp baking powder
  • 1/2 tsp ground cloves
  • 1/2 tsp cinnamon
  • 75g walnuts
  • Pinch of salt
Ingredients for the sauce:
  • 115g unsalted butter
  • 75g caster sugar
  • 40g dark brown sugar
  • 140ml double cream
  • Pinch of salt

Method (if baking):
  1. Pre-heat the oven to 180°C and roast the walnuts for 5-10 minutes. Butter your baking dish.
  2. Make the sauce by putting all the ingredients into a pan with a pinch of salt and heating slowly until the butter has melted, then turn up the heat and bring to the boil. Boil for about 4 minutes, until the sauce has thickened enough to coat the back of a spoon. Pour up to half the sauce into the base of the dish and then put it in the freezer while you make the batter.
  3. Put the dates and bicarbonate of soda in a heatproof dish, pour over the boiling water and add the brandy if using. Leave to soften while you make the batter.
  4. Beat together the butter, sugar and salt with a hand mixer until fluffy. Add vanilla essence to the eggs and beat them into the mixture a little at a time. In other bowl sift together the flour, baking powder and spices and then fold these into the mixture until just combined. Add the dates with their soaking liquid and the walnuts, and mix well. The batter will be a little looser than regular cake batter.
  5. Take the dish out of the freezer and pour the batter on top of the toffee sauce. Bake for 30 minutes, until a skewer inserted into the cake part comes out clean (though remember you might get some of the sauce on the end of the skewer).
  6. When the pudding is ready turn it out onto a dish to serve. Serve with a jug of warmed sauce for pouring, or poke a few holes in the sponge and pour over the rest of the sauce. Serve in bowls as it is, or with ice cream or custard. Alternatively you can let it cool down and reheat it and the sauce in the microwave if you're not serving it immediately.


Method (if steaming):
  1. Prepare a large pan of water for steaming and a buttered pudding basin. If your basin doesn't have its own lid watch this video to see how to make one from foil and buttered parchment.
  2. Roast the walnuts for 5-10 minutes in an 180°C oven - optional, turning the oven on just for this part feels a bit wasteful, but gently roasted nuts do add a nicer flavour than raw nuts.
  3. Put the dates and bicarbonate of soda in a heatproof dish, pour over the boiling water and add the brandy if using. Leave to soften while you make the batter.
  4. Beat together the butter, sugar and salt with a hand mixer until fluffy. Add vanilla essence to the eggs and beat them into the mixture a little at a time. In other bowl sift together the flour, baking powder and spices and then fold these into the mixture until just combined. Add the dates with their soaking liquid and the walnuts, and mix well. The batter will be a little looser than regular cake batter.
  5. Pour the batter into your buttered basin up to about halfway (or as your basin indicates), to give the pudding room to rise. Seal the basin with its lid, or prepared pleated foil and parchment (as described in the video above). Tie the string to make a handle for removing the hot basin later and lower into the pan of simmering water, onto something like an upturned saucer - see photo above. Make sure there is 1cm or so clear between the inside of the pan and the basin and that the hot water comes up to about halfway up the outside of the basin (or as your basin indicates). Cover the pan with a lid, or foil and steam until a skewer inserted comes out clean.
  6. My pudding basin is medium sized at 600ml and it has a hole through the middle like a bundt cake, to help steam quickly and so my pudding was ready in about 45 minutes. If you are using a traditional pudding basin without a hole and/or if you are making a larger pudding then steaming may take 1-2 hours. You might also need to top up the boiling water during the steaming time, keep an eye on it to make sure the water stays high enough to cook the pudding and that you don't boil dry.
  7. Make the sauce by putting all the ingredients into a pan with a pinch of salt and heating slowly until the butter has melted, then turn up the heat and bring to the boil. Boil for about 4 minutes, until the sauce has thickened enough to coat the back of a spoon.
  8. When the pudding is ready turn it out onto a dish to serve. Poke a few holes in the sponge and pour over the sauce. Serve in bowls as it is, or with ice cream or custard. Alternatively you can let it cool down and reheat it and the sauce in the microwave if you're not serving it immediately.


The verdict - (Steamed pudding in the first photo, baked one in the second)

The steamed pudding won. It won so majorly that I barely had time to take this photo of the last piece in the bowl at the party I took it to :) Hurrah! Although the baked version was quicker and also delicious, the steamed pudding was fluffier and remarkably moist. The oven-baked pudding was more intensely sweet all-over perhaps because of the sauce baked into the base, whereas the steamed pudding had more variety in tastes and texture. The baked pudding had a closer crumb, where the steamed pudding was open and springy.

Perhaps next time I'll try putting some sauce in the base of the steamed pudding basin - I was afraid I wouldn't be able to get it out of the steaming mould... I've also seen interesting things along the lines of tarte-tatin with caramelised apples or pears in the base of the pudding. More comfort food experiments ahead to keep us warm in the Tokyo winter months!