Showing posts with label Christmas. Show all posts

Sunday, December 15, 2013

Sugar poinsettias - Getting ready for Christmas


I've been indulging my crafty side recently having fun working on some basic gum paste techniques. The color scheme for my sister's wedding next year is purple and white so I've been practicing various flowers and things for the corsage-type decorations for the cake - but more on that next year I'm sure..!


Since I've been doing taste tests with coverings for traditional British Christmas cakes I thought I'd have a go at something a bit more seasonal as well and went for the red Christmas 'flowers' Poinsettias - the red things are leaves, but more on that in a moment - and some holly.


I'm undecided whether I prefer a simple decoration of something like holly on a flat surface, just the traditional spiky snow scene with a ribbon and no gum paste decorations at all, or a very over the top and showy poinsettia decked out in ribbons. I'm slightly embarrassed by how fun it was trying them all out.

The traditional royal icing snow scene


If you go to a Wilton shop you can get all kinds of handy tools and cutters to make leaf and petal shapes for various flowers and mats to imprint leaf textures etc. Poinsettias however appear to need to be made free-hand - unless you order a set from abroad. I relished the challenge, and had a go.

This is my first attempt, the leaves of which could probably be made a little finer and would benefit from some dark dusting powder to show the textures better. I assembled the red bracts in much the same way you would make a lily petal, folding the little flap over each wire, and then cutting them freehand with scissors.


Designing this reminded me how weird and amazing plants are. Earlier we covered the fact the red bits aren't actually flowers, but have you ever had a good look at the centre of one of these plants? There are crazy things going on in there! When poinsettias are depicted on fabric or in a drawing, there are often just a couple of yellow or gold circles in the center, but on the real plant there are actually intricate little flowers, or "cyathia" there in green, red and yellow. Though strange, my representation in sugar doesn't even do full justice to the wonderfully bizarre arrangement of the actual plant.


The spiny leaves of the holly were created using lily cutters and then a small round cutter to remove semicircles from around the edge. I put a dot of clear varnish on top of the berries so they would shine. Since these displays are for placing on cakes that are for eating, all the wires need to be wrapped in floral tape so that the metal doesn't touch the cake. Note that if you have a large display that you want to anchor into the cake, you should insert your wrapped stems into a plastic flower spike that you push into the cake.
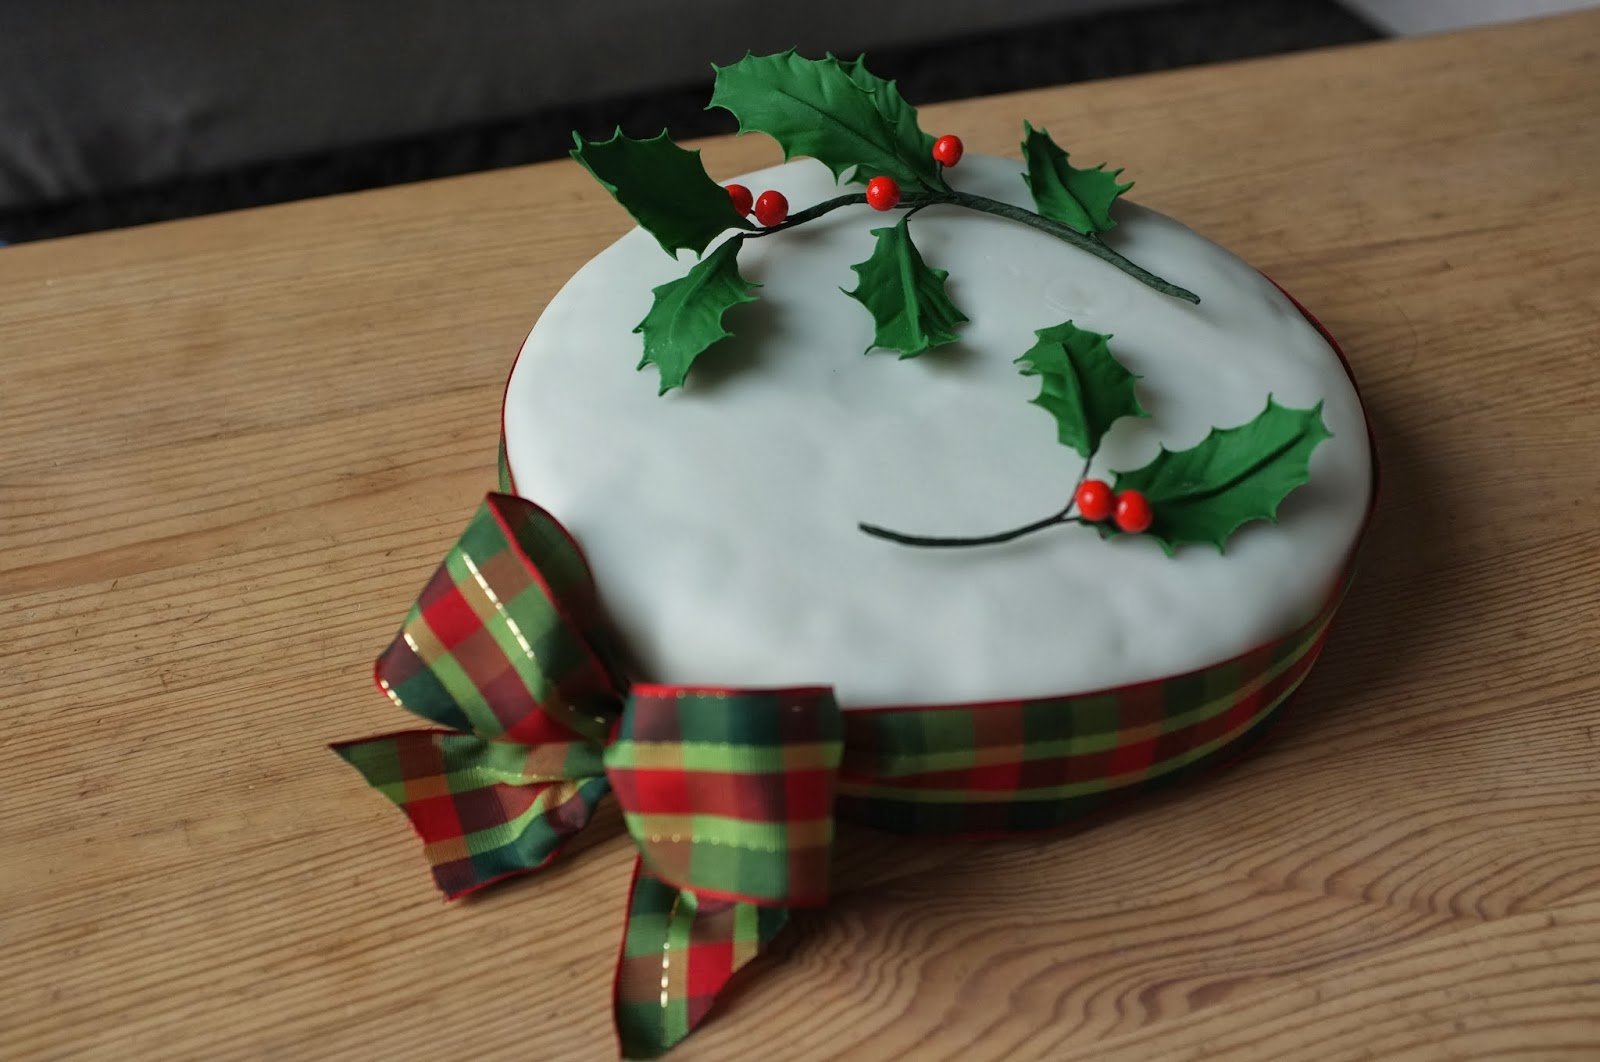

There is, of course, an inherent strangeness to this kind of sugar craft. You go to all the trouble to make something delicate out of sugar, only to include wires and make it inedible.. It is a conundrum, but they are not completely redundant as aside from being quite impressive when made well, they don't wilt as would fresh flowers, and since they are made for special occasions, they can be kept indefinitely as a memento of the occasion if you're careful with them.

It is also possible to make simpler gum paste decorations that contain no wires and would be completely edible, albeit crunchy. You would need to mount them on a gum paste base to set them on the cake, or glue them directly to the cake with edible glue. Similarly, if you make simple decorations using fondant or marzipan, they would be completely edible too.

Oh and yes, all these decorations travelled with me to the UK too, carefully wrapped in tissue in a box in my hand luggage this time. No problems at security for these or the oh, 100 or so macaron shells packed along side them - "you do macarons don't you?" says my sister, the bride to be, "this 10-layer tower I've seen looks great!" (Next year I'll need to take more than 100 macarons..) The Christmas sugar decorations survived the journey quite well, with just a couple of the spiky tips falling casualty along the way.

Sunday, December 8, 2013

Royal icing vs. rolled fondant - Getting ready for Christmas

Traditionally speaking, British Christmas cakes and wedding cakes are heavy, rich fruit cakes that are made weeks or months in advance of the date they are needed, matured and 'fed' regularly with brandy, then covered in a 3 mm or so layer of marzipan and finished off with a hard, white layer of royal icing.


These days if you search online for information about royal icing, you're more likely to find yourself on sites discussing decorating cookies, or perhaps creating lasting decorations. The Wilton site even goes as far as to recommend royal icing is not used as a cake covering. Certainly, the sometimes impractically hard covering created by royal icing would be a strange match for a butter cake or chocolate cake, but I do think it has a place still for fruit cakes.

This year, partly as preparation for making my sister's wedding cake (congrats!) next year, and partly to do the kind of side-by-side taste test I love so much, I made a few Christmas cakes for a rolled fondant vs. royal icing showdown.


Fondant is extremely easy to work with - it stores well if you don't use all of it at once, is easy to cut slices of once it's on a cake, and you can get creative with colours and make all kinds of decorations. The downside for me is that, depending what brand you use, there are a bunch of things in there I wouldn't usually choose to eat, like shortening, thickening agents, emulsifiers, preservatives etc. I have also seen recipes for home-made fondants that include stabilised cream and butter rather than shortening, but I wonder how they would hold up under heat.. more experiments ahead!

Royal icing by contrast is traditionally made with just egg whites and powdered sugar. Some recipes also include the additive of food-grade glycerine (a sugar alcohol) to stop it from drying too hard, others add lemon juice. Many modern British recipes suggest using powdered egg white, or pasturised egg whites instead of raw, to remove any risk of salmonella.

Smooth, but slightly pocked royal icing surface

Slightly bobbly surface of rolled fondant icing

Royal icing can create sharper lines on your cake than fondant, it's also a brighter white than most types of fondant and can hide the lumps and bumps of the fruit cake better, though there are ways to improve the bobbly appearance even when working in fondant. A downside to royal icing as a fruit cake covering is that it's not easy to get a neat cut - even with glycerine it dries very hard! The layer of icing frequently cracks as you cut into the cake, and shatters either side of the knife as you cut down.


Considering its use in traditional wedding cakes, and the common ritual cutting of the cake together, this is a fairly big consideration - you don't want the happy couple giving the impression they can't achieve things together by failing to cut into the cake :) I've found that using glycerine, whipping up the icing to stiff peaks and building the icing up in thin layers on the cake, smoothing and sanding between each layer creates a more powdery (rather than concrete!) covering that a sharp, thin knife can handle relatively easily. I'm still experimenting here.


Having cut these cakes in half I wrapped them up, sealed them in a cake tin and stowed them in my check-in luggage. In preparation for the wedding I also need to discover how well these coverings travel. Indeed, and whether the purported similarity of fondant to Semtex means my case arrives in the UK at all.. :) I'm currently on the plane and shall report back. (Edit: travel success! They both arrived in good condition and were not exploded by airport security.)


In these tests, for elegance and taste the royal icing won hands down but the fondant being easy and practical means it has a lot going for it. I kinda hope my sis choses the royal icing for her wedding cake, but we'll see..!

Monday, November 25, 2013

This year's mincemeat - getting ready for Christmas

Just a quick post to remind any ambitious parties who are planning to embark upon making their own Christmas puddings, mincemeat or Christmas cake, stir-up-Sunday was just this weekend and it is perfect timing to get stuck-in and make your house smell like Christmas.


I wonder how much mincemeat I’ll be making this time next year? I’m so excited about getting started with the business I can barely concentrate on all the (still many, many) tasks at hand in order to start... This year I made a modest amount just for gifts, samples, and I’m reserving a special 400g of it to take back to my family in the UK in a couple of weeks time, to bake mince pies “for Father Christmas” with my niece and nephews.

I made this particular mincemeat with butter instead of the traditional suet, as suet suitable for baking is hard to come by in Japan and I wanted to see if I minded the non-traditional version. I’m pleased to report that I don’t mind at all! It is really lovely. Of course it also means that my vegetarian friends can enjoy the mincepies too.


Here is the recipe I used, adapted from Delia Smith and Mary Berry's recipes.

Ingredients:
  • 225g Bramley apples cored and chopped
  • 175g raisins
  • 110g sultanas
  • 110g currants
  • 25 chopped almonds
  • 110g butter
  • zest and juice 1 lemon
  • zest and juice 1 orange
  • 175g brown sugar
  • 60g dried apricots, chopped
  • 50g candied lemon peel
  • 60g candied orange peel
  • 1 teaspoon mixed spice
  • 1/2 teaspoon cinnamon
  • pinch of salt
  • 4 tablespoons of brandy (or preferred amount to taste)

Method:
  1. Combine all ingredients in a large pan and heat gently to melt the butter and sugar. Continue to heat through very gently for 10 minutes, stiring occasionally and leave to cool.
  2. Once cool, add your preferred amount of brandy and decant into sterilised jars. 
  3. Store the mincemeat in a cool dark place while the flavours develop further until you need it at Christmas.
Note that if you are using glass jars with metal lids, it's best to put a piece of plastic wrap between the lid and the jar to avoid any reaction between the lid and the acidic contents of the jar. 

The best thing about making your own mincemeat is that you can adapt the mix of dried fruit to your own tastes – just keep the total weight of dried fruit roughly the same as your recipe. Many recent recipes add cranberries, I like to add dried apricots, as I think they go fantastically with the almonds and brandy.

If you've also made your own British mixed spice and customised your blend of spices to your preference, then you’ll have a totally unique mincemeat of your own!

Monday, December 3, 2012

Marzipan / almond paste in Japan, and a blind tasting test!

Last week I marzipaned the Christmas cake so that there will be time for it, and later on the royal icing, to dry completely before I head off to the UK for Christmas. Exciting!

Marzipan making night

I made the marzipan I used on the Christmas cake from this Delia Smith recipe, which involves whisking egg yolks and sugar using a bain-marie. You can measure the temperature during the 12-minute whisking stage and make sure it either reaches 71°C or is maintained above 60°C for over 3.5 minutes to kill any salmonella that could be in the egg.


Most British recipes for marzipan contain eggs in some form, frequently raw as in the photos below, but if you check the ingredient list of most shop-bought UK marzipan you'll see it does not.


Indeed, in Germany where they have refined marzipan making to a national craft, eggs appear only rarely to be used. Many eggless recipes involve heating water and sugar, and sometimes glucose to a specific temperature and pouring the hot syrup onto the ground nuts.

Heated to 118C, this syrup became clear and bubbly

I was interested to learn that there are specific legal requirements that need to be met in Germany to be able to call a product marzipan, including that it consists of at least 50% almond paste (marzipanrohmasse) which in itself can consist of only almonds, sugar and water and/or rose water.

The names 'marzipan' and 'almond paste' are often used interchangeably outside Germany, but it's probably helpful to think of almond paste as being a base for making the regular cake-covering/modeling marzipan (add more sugar). Almond paste is also used in baking and for making confections. Here is a breakdown of some of the different classifications of marzipan used in Germany.

Anyway back to the homemade stuff - I wanted to see what discernable differences there are between types of marzipan with/without eggs, cooked vs. raw, almonds vs *other nuts!* and so embarked upon a big making session followed by a blind tasting.

Serious stuff, this!

I subjected my partner, who didn't complain too much, to a taste test before work one morning. We tried out the following marzipans:

A - Shop-bought in France, just before its best before date. A 'control', if you will.
B- Delia Smith's, a cooked version (if you measure the temperature to 71°C) with eggs.
C- Cottage Smallholder recipe, raw with eggs.
D- Dan Lepard's Pecan marzipan (but made with walnuts, for lack of pecans), cooked with eggs.
E- Peter Greweling's eggless recipe, but made with hazelnuts, cooked.
F- BBC Good Food's zesty orange marzipan, raw with eggs.


Our verdict was that out of the homemade versions, the Delia 'cooked' version had a texture that was closest to shop-bought marzipan, as it was drier and finer-grained. All of the raw marzipans were comparably wet and sticky, which was a lovely feature when used inside stollen, but could be challenging to roll out to cover a cake - I'd recommend being prepared to use a little more almond powder and sugar in either C or F recipes to combat that (particularly F).


The non-almond versions were lovely, especially the Dan Lepard version, D although I don't understand why both the glucose and the glycerine were necessary. Either way I'm now going to have to get more nuts to try the pecan version - maybe with bourbon. I'm also curious to have a go at something with just/mainly honey and almonds to see how that tastes and behaves.


D was a little crumblier in texture but I think that was more to do with the ground walnuts (done in a blender) being less uniform than the pre-ground almond powder I used for many of the other recipes. There is so much scope for variation - cardamon-flavoured Iranian toot, pistachio marzipan, cinnamon and other spices, pine nuts and perhaps trying something like one of my absolute favourite nut paste treats turron de jijona.

I also tried baking the marzipan to see if any of the different versions would melt away, and none did. It all browned quite quickly in a hot oven, and A and E (eggless) remained wetter inside compared with the other versions. Delia marzipan (B) was the firmest on baking and reminded me of the texture of white anko paste.. I'd say the Delia recipe is best eaten cold/used to cover cakes.


I now have a ton of marzipan :) Aside from covering the Christmas cake I'm experimenting using the different flavours to stuff my stollen loaves, using some to as alternative mince pie lids, and having slices of the walnut one in particular with glasses of sherry. Cheers!

If you're not interested in having a go at making your own, you can buy marzipan online in Japan from quite a few places as it turns out, starting with here and here. It’s most commonly called マジパン / majipan, which usually refers to the high sugar content type of regular marzipan we're all familiar with that's good for covering cakes (at least 50% sugar). Even if you are making your own you might still find it more economical to order your ground almonds and powdered sugar online too (Nissin supermarket almond powder is 980 yen for 350g and you can pay just slightly over 1,000 yen for about 1kg online).

You'll find almond paste / marzipanrohmasse referred to as マジパンローマッセ / majipan rohmasse or ローマジパン / roh majipan / raw marzipan. Both of these names refer to the higher nut-to-sugar ratio almond paste (2:1 nuts to sugar, with up to 35% sugar). Incidentally you can get the real thing - Lübecker marzipanrohmasse in Japan too, I'm definitely going to have to check some of that out!

The history of marzipan and its etymology are contested and fascinating. The tradition of kneading ground nuts with a binding agent such as honey goes back at least as far as 1800 BC Egypt, but the particular almond and sugar incarnation is claimed to be originally Iranian, or Chinese, Spanish, possibly Italian... There are stories in Arabian Nights of marzipan being used during Ramadan and of it being an aphrodisiac, and of it being transported to Europe by crusaders. Other origin stories involve resourceful Toledo nuns, inventive French cooks, and a day-dreaming Venetian baker's daughter making a mistake with a recipe. It was supposed to have been used as a palate cleanser at medieval banquets, in times when sugar and almonds were expensive it was a gift fit for royalty, then in the 18th century Germany it was given as a christening present.
Today the taste of marzipan appears to divide people almost as much as does coriander.

The unusual name is variously explained as coming from March bread, St. Marc's bread, little box, the king who sits still ..! To quote from the online etymology dictionary:
"marzipan (n.) 1901 (in modern use; earlier march payne, late 15c., from French or Dutch), from Ger. Marzipan, from It. marzapane "candy box," from M.L. matapanus "small box," earlier, "coin bearing image of seated Christ" (altered in Italian by folk etymology as though from L. Marci panis "bread of Mark"), of uncertain origin. One suggestion is that this is from Arabic mawthaban "king who sits still." Nobody seems to quite accept this, but nobody has a better idea. The Medieval Latin word also is the source of Sp. marzapan, Fr. massepain."


Monday, November 26, 2012

Bramley apple pie - pre-cooked filling vs. apple slices filling

Apple pie is my favourite thing to make (and eat) with Bramley apples (this link includes updated information on how to get them in Japan), with a crumbly double pie-crust made with simple all-butter shortcrust pastry, or a rich sweet shortcrust pastry. As I rave about excitedly in my first Bramleys in Japan post, British style apple pie made with Bramley cooking apples is tarter than American apple pie, and the apples end up as more of a fluffy puree rather than clearly defined slices. It is the taste from the tree in my childhood house.

Pre-cooked filling on left, apple slice filling on right

Working from a basic recipe you can add all kinds of things to the filling (sultanas, nuts, cinnamon  cloves, a splash or steeping of a choice alcohol, lemon or orange zest, some flour or cornflour if you find your apples produce too much juice, caramel sauce, marzipan..) and/or to the pastry itself (ground almonds or hazelnuts, cheddar cheese, a little baking powder, spices...). Depending on the type of dish you use, the nature of your oven and how you want your pie too look, you will also be able to change the amount of ingredients, cooking times, and temperatures.

To get started with a basic recipe, you’ll need roughly 500g of shortcrust pastry and 700g of Bramley apples (about 2 large ones) for a 22 cm pie dish. I used about 500g of apples for each of the 18 cm shallow-dish pies in this post.

Sweet shortcrust pastry (about 500g)
  • 275g flour
  • 175g chilled butter, diced
  • Pinch of salt
  • 25g sugar
  • 1 egg, beaten
  • 2 tablespoons of cold water

Pie filling
  • About 700g of Bramley apples for a 22cm pie dish
  • Squeeze of lemon juice
  • Between 0 - 100g of sugar, depending how tart your apples/sweet your tooth
  • 25g of butter, diced
  • Any additional ingredients of your choosing (spices, nuts etc..)

For the pastry, sift the flour and salt and rub the cold butter into flour briefly, until there are no very large lumps of butter left, stir in the sugar. Mix in the beaten egg and cold water with a round bladed knife and bring the dough together into a flat disc with your hands. Wrap in plastic and chill for at least 30 minutes, bringing it out of the fridge again 15 mins or so before you need to roll it out so that it's still cold but not solid to roll. Top tip! - if the sweet pastry misbehaves when rolling, try rolling it between two lightly floured sheets of plastic wrap, peeling them away carefully when you line the pie dish. Prick the base with a fork, scatter with ground almonds (optional) and leave the pastry hanging over the edge until you place the lid.


For the filling you can either peel and core the apples, cut them into chunks and -
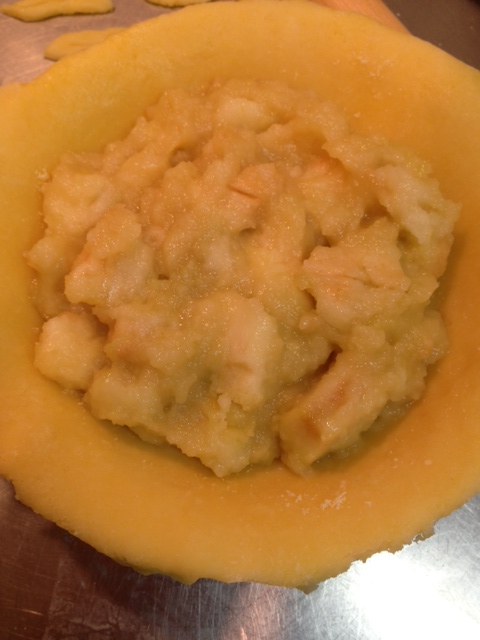
a) heat them through in a saucepan with the lemon juice, sugar and butter until they start to soften into a puree to use in the filling (some chunks of apple left in the puree are fine, and desirable.) Be sure to let your puree cool completely before using so that you don’t prematurely melt the butter in the bottom crust of the pie (1st photo), or you can -
b) toss them in some lemon juice and sugar and pile them in the pastry-lined pie dish as raw chunks with little bits of butter dotted over them before putting the pastry lid on the pie (2nd photo).


With your preferred filling in place, wet around the edges of the bottom crust and lift your lid on top. Cut a couple of slits or holes for air vents and press down gently around the edge of the lid to secure it and push out the air. Hold your dish like a waiter with a tray, and slice off the over-hanging crust (if you love lots of crust, you could instead fold the lid and overhang under itself, a bit more American-style pie maybe? Nice link here on American-style crimping and tips on lattice top pies too).


Crimp edges or press down around the edge with a fork to make a pattern, and decorate to your heart's content with the pastry trimmings - my favourite part when I was little. You can freeze/chill the pie at this point for later baking, or brush the finished pie with milk (which I prefer) or egg wash (as used in these examples), sprinkle with sugar and bake. My little pies for this post took 25 minutes at 190°C, a 22 cm pie will probably be closer to 40 minutes.


If you are using the raw fruit method in particular, you will need to use quite a hot oven temperature (190-220°C) to get the pieces of fruit to go soft inside the pie. Be ready with some foil to drape over the top of the pie (or fold loosely around the edges of the pie) if you notice the pastry browning too quickly on top - this is a particular problem with small ovens used in Japan, as your pie will take up most of the space in the oven and be quite close to the oven roof.

No, these aren't the ideal dishes for baking pie...

The differences between the two methods of preparing the filling are that the pre-cooked filling (on the left) is a flatter pie with a more dense and jammy filling, whereas the raw fruit method (on the right-side) gives a more dome-like shape, often with pockets of space under the top crust of the pie as the Bramley apple pieces mush somewhat during baking and reduce in size. It makes for a rustic, bobbly appearance to the lid of the pie, and probably also helps to prevent soggy-bottomed pastry, as the filling only becomes wet with juice after the pastry base already has had time to bake.


Heating up the baking tray in advance in a hot 220°C or so oven, ahead of reducing the temperature to your normal baking temperature, will also help to cook the bottom crust properly for either filling method. Using an enamel pie dish will also help you get a good bake on the base, and if you use a glass dish you'll be able to see at any point how well the base is doing.

If you have pastry left over you could make jam tarts or mince pies! (Which is another fine use for Bramleys...)

Mini mince pies with homemade Christmas mincemeat filling

Making up a double batch of the sweet shortcrust pastry isn't a bad idea as it keeps for a 3 days in the fridge, and freezes well for up to 3 months.

--
Here are a few good alternative pastry recipes that work well with apple pie:

Classic plain shortcrust, half fat to flour, no sugar. Good photos:
http://www.deliaonline.com/how-to-cook/baking/how-to-make-shortcrust-pastry.html
Sweet shortcrust made with icing sugar, butter, eggs and milk: 
http://www.jamieoliver.com/recipes/pastry-cake/old-fashioned-sweet-shortcrust-pastry
French-style sweet pastry made with the creaming method:
http://www.bbc.co.uk/food/recipes/pate_sucree_39572
Cheddar cheese crust apple pie recipe from Delia Smith:

Wednesday, December 14, 2011

Christmas cake in Japan (part 3 - marzipan+icing!)

Following on from the Christmas cake recipe post, you now have a beautiful, boozy fruitcake that you've been lovingly watering with brandy for a few weeks. The next steps are to marzipan and ice it to turn it into the traditional festive treat.

I have not been able to find marzipan in Japan yet (correction, now I have!), but it is quite easy to make. I tested out a raw egg version against a slightly cooked egg version, and the end results were very similar. I used about 700g of the cooked version and found it was quite enough to cover my 9 inch cake without being too stingy on the thickness.

Here's what you do when you've made your marzipan:
  • Roll out your marzipan in a large round to your desired thickness. Some recipes advise cutting out a piece the exact size of the top of your cake, and doing strips for the sides separately, but I went for the large circle to encompass the whole cake in one go. If your marzipan is sticky and hard to roll, try rolling it between two sheets of plastic wrap, it helps a lot!
  • Heat up a few tablespoons of apricot jam in a pan. This will make it runnier and easier to apply to the cake but most importantly it will kill any tiny spores of mold that might be forming in the jar, unbeknownst to you.
  • Place your fruitcake on a cake board or baking paper, with the bottom side facing up to create a nice flat surface for icing.
  • Add a little brandy to the jam and brush the warm 'glue' all over the top and sides of the cake. Give it plenty on the sides to avoid the marzipan dropping off when you're cutting the cake later.
  • Place the large round of marzipan over the top of the cake and gingerly smooth it down the sides, cutting off any excess that trails around the edges. Smooth it down nicely with your hands and press together any cracks that appear. Don't worry too much if you have to patch parts of it, the marzipan will be completely covered by icing later.
  • Put the cake somewhere cool and dry for a few days, up to a week, so that the marzipan can dry out completely. If you skip this drying stage then the oil from the almond powder can discolour your icing, apparently. I laid a piece of baking paper loosely over the top to stop it getting dusty.


While the marzipan is drying out you have a week to look around for ornaments for the top of the cake. :) Once it's dry, you'll be covering the cake with icing. You can use fondant icing if you like, which is a rollable gummy kind of icing that doesn't get too hard, even when on the cake. In the UK you can buy this ready made and just roll it out to fit your cake. I haven't yet found it in Japan, but I preferred the sound of using home made traditional royal icing anyway, and set my mind on doing a rough snow scene of a cake with swirls and peaks. Royal icing is made with icing sugar, whipped egg whites and lemon juice. Most recipes call for adding some glycerine to stop the icing from drying too hard, but I was unable to get hold of food-quality glycerine in time for the cake. Any Japanese pharmacy sells a form of glycerine intended for external use, but I understand that this is not of the quality you'd want to be putting in your food. Next time I'll try ordering online in advance.

Making the icing was a bit intimidating but it all came together easily enough, following the recipe and whipping with a hand mixer on slow speed as the consistency gradually stiffened with the whipping and adding of sugar. Slapping the icing on the cake was also huge fun, and although I found a rubber spatula easier to use than the traditional pallet knife, I found it was difficult to make it look too bad whatever I did.

Two things I would advise perhaps: if you're adding a tiny bit of blue food colouring to make your white dazzling bright, as many royal icing recipes confide, do add just a tiny, tiny amount at a time and mix it in completely. Also, though slapping and swirling the icing on is fun, when I do it again I'm probably going to make my icing layer slightly thinner - The top layer of the icing dried out overnight, but to my initial horror it was still marshmallow-like under that crisp shell when we excitedly cut our first slice. Patience prevailed and a few (4) days later the whole thing was completely dry. Solid! It's really quite hard to cut through the icing layer without parts of it shattering, and I think the glycerine would have helped there along with the icing being a slightly thinner layer.

Over all though, it's a great success. It tastes just like it should, the cake is wonderfully moist and doesn't taste too boozy despite the regular and generous brandy feedings, you can taste the marzipan, and the fresh royal icing tastes fantastic, even if it does come in bits. I took a few slices to a party recently and it was very warmly received. With a 9 inch cake I'll be giving slices away for some time to come!

Here's the finished product:

Decorations from Roppongi Hills German Christmas market, Nissin + the 100 yen shop
And here's the inside.

Merry Christmas!