Showing posts with label Autumn. Show all posts

Tuesday, September 9, 2014

Speaking at the RHSJ Bramley tour in Obuse 2014

Last week my Bramley apple adventure continued when I was invited by the Japan branch of the Royal Horticultural Society to talk at this year's RHSJ Bramley apple tour in Obuse, Nagano. Readers with good memories might recall my excitement at going along to the same tour last year as a participant, and my report about visiting the orchard there for the first time. It was a real treat to be able to visit the orchard with many friends from the Bramley Fan Club in Japan, thanks for a great day!


This year I was to give a little talk at the orchard, and bring some Bramley-themed treats for the participants to take home as souvenirs. I settled on apple cake and small apple crumble pies (forgot to photo, oops), as well as a whole pie.


On the way to Nagano, the sky threatened rain and by the time we arrived in Obuse it was properly pouring down, just like we were in the UK (Obuse is pronounced o-bu-say by the way, rather than sounding like "abuse." Just in case you were wondering).

View from the train, could be the UK or Japan :)

Chef Ichimura's lunch at Hanaya was as fantastic and creative as it was last year - it's amazing what thoughtful Japanese chefs do with our humble apple pie/apple crumble fruit!


I was particularly struck by the sushi piece of the 3-bite starter. It was so soft and delicately flavoured.


After lunch we dodged a few puddles and went to find the tree that Celia-san (Great Granddaughter of Henry Merryweather, the first person to notice and begin selling Bramley apples in the UK in the late 1800s) planted on her trip to Obuse last year. The young tree appears to be doing very well, and is in a nice spot, visible from the restaurant.


From there to the orchard! The rain had let up a little and so we were able to pick our own fruits to take home. As we were leaving a heavy fog rolled in and that too felt brisk and British. I don't remember seeing fog in Tokyo - it's quite a world away being up in the hills of Nagano.


The talks were to be given in warmer and drier surroundings back at the apple packing plant.

Arai-san

First Arai-san, the gentleman responsible for bringing the Bramley to Japan officially over 20 years ago spoke of how apples of all varieties had been important in his life, and how it was a struggle initially to convince many apple growers in Japan to take a chance on the strange and sour British fruit. It takes a few years from the initial work and investment until the trees will bear fruit and so it's quite a commitment for the farmers to make.

Oshima-san

Next one of those apple growers who did take the plunge, Oshima-san, talked about a year in the life of caring for the Bramleys in Japan, and how one year's crop can differ considerably to another. He'd also brought along a *huge* Bramley. I thought it might be the biggest in the world (that record was in 1997 to a 1.67kg beast), but it must certainly be the biggest in Japan. Amazing.

Me :)

For my talk, I decided to have a few different sections - what Bramleys are to British people, and bit about the history - from the chance seedling growing from a pip planted by a little girl playing in her Nottinghamshire garden in 1809, to the involvement of Henry Merryweather, the extensive planting across the UK in the late 1800s, and the important nutritional role the Bramley (and all manner of home-grown fare) played during the wars - all going some way to explain how they have come to be such a widely loved and commonplace ingredient it is for the UK today.

I also talked about growing up with Bramley apple trees in my garden, and how when I saw ohanami on TV as a child, I thought that people in Japan were picnicking under apple trees.

Finally, I gave some tips on cooking with Bramleys, from the British home baking viewpoint - that we usually cook them down before adding them to pies, as they will cook to a puree anyway during baking, which leaves behind large cavities in your pie if you used the slices raw like for American and Dutch style apple pies.

At the end of the talk I shared the large British-style Bramley apple pie with the participants before they rushed to get the bus back to the station.

This year I was determined to also try visit the Iwasaki bakery, home to the famous Chelsea buns from the book I heard about on the tour last year.  (See the end of this post for the story about the Canadian nurse and the Obuse Chelsea bun connection :) ).


Arai-san was kind enough to give me this monster of a Chelsea bun, and it made a very hearty breakfast the next morning. It was really good with the crunchy nuts on the bottom!


As I left for the day, look what I was given as a thank you for the talk! It's now in pride of place at the shop, at least until I work out what I want to make with it ;) Nyam!


Ginny is pretty shocked at the size too

Thursday, January 31, 2013

Steam vs. bake - The sticky toffee pudding trials

Sticky toffee pudding, known in some countries as sticky date pudding, is another classic British comfort food like jam roly-poly that reminds me of school dinners (which is what we call school lunch in the North of England). It’s traditionally steamed in a pudding bowl, but is more like a cake than a pudding. Certainly it is more like a cake than Japanese プリン / pudding. Made with the dried fruit, nuts and wintery spices like cloves, served hot with a warm caramel toffee sauce poured over - it might look a bit inelegant but it’s shockingly good.


It isn't unusual for people to huddle possessively over their bowl until it’s finished. It was just such a reaction from a friend I had eventually made the pudding for that produced one of the first inklings that I might have a chance at making my little business idea work - She was so profoundly happy to taste it again after years living in Japan.

Though the pudding was traditionally steamed, most recipes you find today are for baking it. I was curious to see if there would be much difference to the end result between steaming and baking the sticky toffee pudding, and to see which would be better. If the steaming is good, I also thought to myself, then it means this is one traditional British dessert that can even be made in those Japanese kitchens that don't have an oven!

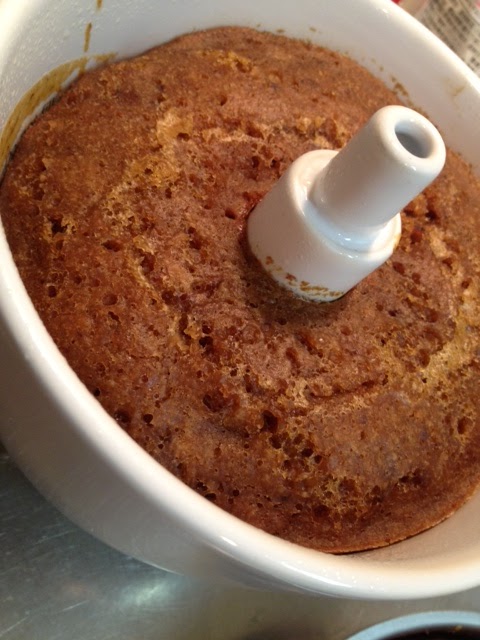
Sticky toffee pudding steamed in a pudding basin

The same sticky toffee pudding recipe baked in the oven

I used exactly the same recipe for each pudding, adapted from Felicity Cloake's in-depth investigations into some of the most well known versions.

This amount in the recipe made enough to divide between my 600ml pudding basin and a 14cm heart-shaped cake tin.
If you're only going to be baking then Felicity suggests a 24cm x 24cm square baking dish.
If you're only steaming then either do 2 smallish puddings in 500ml capacity basins or use one large 1-1.5 litre basin and adjust steaming times accordingly. If you don't have a pudding bowl any good solid, deep and heatproof bowl with a rim around the top to help keep the string in place will do.

Ingredients for the sponge:
  • 175g dates, stoned and barely chopped (I like chunks of date in the pudding)
  • 1 tsp bicarbonate of soda
  • 200ml boiling water
  • 100ml brandy (or just use 300ml boiling water/weak tea)
  • 50g unsalted butter, softened
  • 80g light brown sugar
  • 80g dark brown sugar
  • 2 eggs, beaten
  • 1/2 tsp vanilla essence
  • 175g plain flour
  • 1 tsp baking powder
  • 1/2 tsp ground cloves
  • 1/2 tsp cinnamon
  • 75g walnuts
  • Pinch of salt
Ingredients for the sauce:
  • 115g unsalted butter
  • 75g caster sugar
  • 40g dark brown sugar
  • 140ml double cream
  • Pinch of salt

Method (if baking):
  1. Pre-heat the oven to 180°C and roast the walnuts for 5-10 minutes. Butter your baking dish.
  2. Make the sauce by putting all the ingredients into a pan with a pinch of salt and heating slowly until the butter has melted, then turn up the heat and bring to the boil. Boil for about 4 minutes, until the sauce has thickened enough to coat the back of a spoon. Pour up to half the sauce into the base of the dish and then put it in the freezer while you make the batter.
  3. Put the dates and bicarbonate of soda in a heatproof dish, pour over the boiling water and add the brandy if using. Leave to soften while you make the batter.
  4. Beat together the butter, sugar and salt with a hand mixer until fluffy. Add vanilla essence to the eggs and beat them into the mixture a little at a time. In other bowl sift together the flour, baking powder and spices and then fold these into the mixture until just combined. Add the dates with their soaking liquid and the walnuts, and mix well. The batter will be a little looser than regular cake batter.
  5. Take the dish out of the freezer and pour the batter on top of the toffee sauce. Bake for 30 minutes, until a skewer inserted into the cake part comes out clean (though remember you might get some of the sauce on the end of the skewer).
  6. When the pudding is ready turn it out onto a dish to serve. Serve with a jug of warmed sauce for pouring, or poke a few holes in the sponge and pour over the rest of the sauce. Serve in bowls as it is, or with ice cream or custard. Alternatively you can let it cool down and reheat it and the sauce in the microwave if you're not serving it immediately.


Method (if steaming):
  1. Prepare a large pan of water for steaming and a buttered pudding basin. If your basin doesn't have its own lid watch this video to see how to make one from foil and buttered parchment.
  2. Roast the walnuts for 5-10 minutes in an 180°C oven - optional, turning the oven on just for this part feels a bit wasteful, but gently roasted nuts do add a nicer flavour than raw nuts.
  3. Put the dates and bicarbonate of soda in a heatproof dish, pour over the boiling water and add the brandy if using. Leave to soften while you make the batter.
  4. Beat together the butter, sugar and salt with a hand mixer until fluffy. Add vanilla essence to the eggs and beat them into the mixture a little at a time. In other bowl sift together the flour, baking powder and spices and then fold these into the mixture until just combined. Add the dates with their soaking liquid and the walnuts, and mix well. The batter will be a little looser than regular cake batter.
  5. Pour the batter into your buttered basin up to about halfway (or as your basin indicates), to give the pudding room to rise. Seal the basin with its lid, or prepared pleated foil and parchment (as described in the video above). Tie the string to make a handle for removing the hot basin later and lower into the pan of simmering water, onto something like an upturned saucer - see photo above. Make sure there is 1cm or so clear between the inside of the pan and the basin and that the hot water comes up to about halfway up the outside of the basin (or as your basin indicates). Cover the pan with a lid, or foil and steam until a skewer inserted comes out clean.
  6. My pudding basin is medium sized at 600ml and it has a hole through the middle like a bundt cake, to help steam quickly and so my pudding was ready in about 45 minutes. If you are using a traditional pudding basin without a hole and/or if you are making a larger pudding then steaming may take 1-2 hours. You might also need to top up the boiling water during the steaming time, keep an eye on it to make sure the water stays high enough to cook the pudding and that you don't boil dry.
  7. Make the sauce by putting all the ingredients into a pan with a pinch of salt and heating slowly until the butter has melted, then turn up the heat and bring to the boil. Boil for about 4 minutes, until the sauce has thickened enough to coat the back of a spoon.
  8. When the pudding is ready turn it out onto a dish to serve. Poke a few holes in the sponge and pour over the sauce. Serve in bowls as it is, or with ice cream or custard. Alternatively you can let it cool down and reheat it and the sauce in the microwave if you're not serving it immediately.


The verdict - (Steamed pudding in the first photo, baked one in the second)

The steamed pudding won. It won so majorly that I barely had time to take this photo of the last piece in the bowl at the party I took it to :) Hurrah! Although the baked version was quicker and also delicious, the steamed pudding was fluffier and remarkably moist. The oven-baked pudding was more intensely sweet all-over perhaps because of the sauce baked into the base, whereas the steamed pudding had more variety in tastes and texture. The baked pudding had a closer crumb, where the steamed pudding was open and springy.

Perhaps next time I'll try putting some sauce in the base of the steamed pudding basin - I was afraid I wouldn't be able to get it out of the steaming mould... I've also seen interesting things along the lines of tarte-tatin with caramelised apples or pears in the base of the pudding. More comfort food experiments ahead to keep us warm in the Tokyo winter months!


Monday, November 26, 2012

Bramley apple pie - pre-cooked filling vs. apple slices filling

Apple pie is my favourite thing to make (and eat) with Bramley apples (this link includes updated information on how to get them in Japan), with a crumbly double pie-crust made with simple all-butter shortcrust pastry, or a rich sweet shortcrust pastry. As I rave about excitedly in my first Bramleys in Japan post, British style apple pie made with Bramley cooking apples is tarter than American apple pie, and the apples end up as more of a fluffy puree rather than clearly defined slices. It is the taste from the tree in my childhood house.

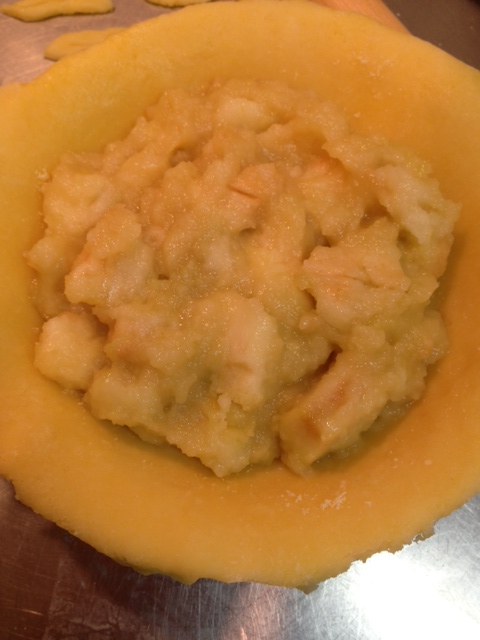
Pre-cooked filling on left, apple slice filling on right

Working from a basic recipe you can add all kinds of things to the filling (sultanas, nuts, cinnamon  cloves, a splash or steeping of a choice alcohol, lemon or orange zest, some flour or cornflour if you find your apples produce too much juice, caramel sauce, marzipan..) and/or to the pastry itself (ground almonds or hazelnuts, cheddar cheese, a little baking powder, spices...). Depending on the type of dish you use, the nature of your oven and how you want your pie too look, you will also be able to change the amount of ingredients, cooking times, and temperatures.

To get started with a basic recipe, you’ll need roughly 500g of shortcrust pastry and 700g of Bramley apples (about 2 large ones) for a 22 cm pie dish. I used about 500g of apples for each of the 18 cm shallow-dish pies in this post.

Sweet shortcrust pastry (about 500g)
  • 275g flour
  • 175g chilled butter, diced
  • Pinch of salt
  • 25g sugar
  • 1 egg, beaten
  • 2 tablespoons of cold water

Pie filling
  • About 700g of Bramley apples for a 22cm pie dish
  • Squeeze of lemon juice
  • Between 0 - 100g of sugar, depending how tart your apples/sweet your tooth
  • 25g of butter, diced
  • Any additional ingredients of your choosing (spices, nuts etc..)

For the pastry, sift the flour and salt and rub the cold butter into flour briefly, until there are no very large lumps of butter left, stir in the sugar. Mix in the beaten egg and cold water with a round bladed knife and bring the dough together into a flat disc with your hands. Wrap in plastic and chill for at least 30 minutes, bringing it out of the fridge again 15 mins or so before you need to roll it out so that it's still cold but not solid to roll. Top tip! - if the sweet pastry misbehaves when rolling, try rolling it between two lightly floured sheets of plastic wrap, peeling them away carefully when you line the pie dish. Prick the base with a fork, scatter with ground almonds (optional) and leave the pastry hanging over the edge until you place the lid.


For the filling you can either peel and core the apples, cut them into chunks and -
a) heat them through in a saucepan with the lemon juice, sugar and butter until they start to soften into a puree to use in the filling (some chunks of apple left in the puree are fine, and desirable.) Be sure to let your puree cool completely before using so that you don’t prematurely melt the butter in the bottom crust of the pie (1st photo), or you can -
b) toss them in some lemon juice and sugar and pile them in the pastry-lined pie dish as raw chunks with little bits of butter dotted over them before putting the pastry lid on the pie (2nd photo).


With your preferred filling in place, wet around the edges of the bottom crust and lift your lid on top. Cut a couple of slits or holes for air vents and press down gently around the edge of the lid to secure it and push out the air. Hold your dish like a waiter with a tray, and slice off the over-hanging crust (if you love lots of crust, you could instead fold the lid and overhang under itself, a bit more American-style pie maybe? Nice link here on American-style crimping and tips on lattice top pies too).


Crimp edges or press down around the edge with a fork to make a pattern, and decorate to your heart's content with the pastry trimmings - my favourite part when I was little. You can freeze/chill the pie at this point for later baking, or brush the finished pie with milk (which I prefer) or egg wash (as used in these examples), sprinkle with sugar and bake. My little pies for this post took 25 minutes at 190°C, a 22 cm pie will probably be closer to 40 minutes.


If you are using the raw fruit method in particular, you will need to use quite a hot oven temperature (190-220°C) to get the pieces of fruit to go soft inside the pie. Be ready with some foil to drape over the top of the pie (or fold loosely around the edges of the pie) if you notice the pastry browning too quickly on top - this is a particular problem with small ovens used in Japan, as your pie will take up most of the space in the oven and be quite close to the oven roof.

No, these aren't the ideal dishes for baking pie...

The differences between the two methods of preparing the filling are that the pre-cooked filling (on the left) is a flatter pie with a more dense and jammy filling, whereas the raw fruit method (on the right-side) gives a more dome-like shape, often with pockets of space under the top crust of the pie as the Bramley apple pieces mush somewhat during baking and reduce in size. It makes for a rustic, bobbly appearance to the lid of the pie, and probably also helps to prevent soggy-bottomed pastry, as the filling only becomes wet with juice after the pastry base already has had time to bake.


Heating up the baking tray in advance in a hot 220°C or so oven, ahead of reducing the temperature to your normal baking temperature, will also help to cook the bottom crust properly for either filling method. Using an enamel pie dish will also help you get a good bake on the base, and if you use a glass dish you'll be able to see at any point how well the base is doing.

If you have pastry left over you could make jam tarts or mince pies! (Which is another fine use for Bramleys...)

Mini mince pies with homemade Christmas mincemeat filling

Making up a double batch of the sweet shortcrust pastry isn't a bad idea as it keeps for a 3 days in the fridge, and freezes well for up to 3 months.

--
Here are a few good alternative pastry recipes that work well with apple pie:

Classic plain shortcrust, half fat to flour, no sugar. Good photos:
http://www.deliaonline.com/how-to-cook/baking/how-to-make-shortcrust-pastry.html
Sweet shortcrust made with icing sugar, butter, eggs and milk: 
http://www.jamieoliver.com/recipes/pastry-cake/old-fashioned-sweet-shortcrust-pastry
French-style sweet pastry made with the creaming method:
http://www.bbc.co.uk/food/recipes/pate_sucree_39572
Cheddar cheese crust apple pie recipe from Delia Smith: