 |
| Two types of kombu sourdough |
There was method to the madness as you'll know if you've seen any of my sourdough journey posts - I read that part of the complex flavour of sourdough comes from the presence of the umami maker L-glutamate, and I wondered if it might be further enhanced with the addition of one the foodstuffs with some of the highest concentrations of umami, kombu seaweed.
Kombu is often present in Japanese food as a flavour enhancing ingredient. It's extolled as being essential to the most refined and elegant of traditional Japanese cooking, but when you start checking labels you see it in almost everything!
Have a look next time you're in a combini - soups, cheap snacks... In the image above you can see こんぶエキスパウダー / kombu extract powder in the ingredients of a standard bag of plain ready-salted crisps. In the UK this would probably be marketed as something like artisanal 'hand-cooked kettle chips with umami essence' but here it seems to be run-of-the-mill.
I tested two types of kombu in the doughs - shio kombu 塩昆布 / salted kombu and ma kombu 真昆布 / 'true' konbu which is a particularly high quality type of kombu from Hokkaido. Since I wanted to use the pieces of seaweed in the dough itself I bought pre-shredded 刻み / kizami type of ma kombu.
 |
| Left: ma-kombu, right: shio kombu |
If you wanted to have just the umami flavour without the feature of bits of seaweed visible in the crumb, you could make a dashi (stock) from kombu and use that in place of water in your recipe. There are a couple of simple ways to do this listed here or if you want to get very serious about it have look at this technical post.
 |
| Tiny bit of seaweed peeking through the crust |
I used 5g of each kombu in the half-sized loaves in these pictures, so that'll be 10g in a full sized 680g loaf.
Kombu sourdough recipe:
- 240g starter
- 240g water
- 10g shredded kombu (such as shio-kombu or kizami ma kombu)
- 7g salt (about 1.5 teaspoons) however if using shio-kombu reduce this to about 3g of salt.
- 470g bread flour
- splash of olive oil to stop it sticking to the bowl in bulk fermentation.
- Add the kombu and salt to your water and stir, pour water mixture into a large bowl along with your starter. Stir in the flour a handful at a time until it is too stiff to mix well with a spoon. You'll have added half to two thirds of the flour.
- Cover bowl loosely with cling film and let it rest for 15 minutes, this will start to develop the gluten and make kneading easier.
- Tip the dough onto a floured surface, scraping the bowl cleanish, and knead in the rest of the flour. The texture of the dough will become satiny and springy during this time, you might not need all the flour.
- Splosh a little oil into the bowl you just used and return the ball of dough to the bowl.
- Cover with cling film and leave to rise overnight. In my roughly 21°C kitchen this takes about 8 hours.
- Tip out the dough, stretch it out slightly and fold in the sides as if you were folding a blanket to make a tidy square and let it relax for 15 minutes.
- Shape the dough into your preferred shape and leave for the final proof either free-standing seam side down or seam side up in a floured banneton. Leave until risen by about half the size.
- Preheat your oven with baking sheet or stone to 250°C or as high as it will go.
- Dust with flour lightly if you like the effect and slash the skin of the dough before misting with water and baking in a hot oven until red-brown, feels light for its size and has an internal temperature of over 90°C. In my oven this takes about 40 minutes.
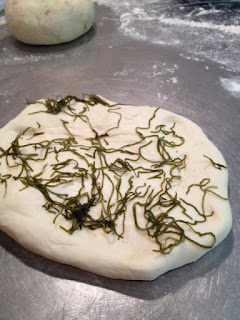
Another option illustrated in the first picture above is to introduce the kombu strands to the dough after the main kneading has taken place. In this case soak them briefly to make them pliable, stretch out the dough and knead it for a minute or so to distribute the strands through the dough.
 |
| Slashed and ready to bake |
 |
| Crumb - top:shio kombu, bottom: ma kombu |
You can see that the shio kombu loaf had an ever so slightly darker crumb, probably due to that type of kombu being prepared with soy sauce. The appearance and flavour of the ma kombu bread was more delicate and I think I could have used more than the amount in this recipe without it being overpowering. Due to the soy sauce component of the shio kombu however I'd recommend keeping within the 10g for a full sized loaf to avoid making a soy sauce flavour sourdough :)
In the images below, the first is the ma kombu loaf, and the second is the shio kombu loaf.
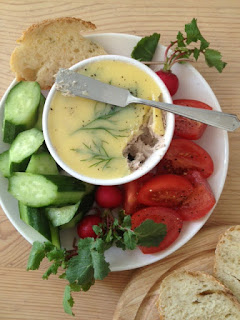
We tested the breads on their own, with oil for dipping, and then chose our favourite ones to spread with a homemade mackerel pate. SO good! And cheap - this was made from simple tinned mackerel in brine, cream cheese, dill, lemon and grated radish, mash up with a fork and adjust amounts to taste. Melt some butter and pour it over the top of the pate before chilling to set. Where's the picnic! Mackerel is called saba 鯖 / サバ in Japanese, in case you'd like to make some yourself.
 |
| Spot the 4 umami things here? |


Hello I really love your blog. Seaweed in bread is a brilliant idea. I may have to have a go myself. I look forward to reading more of your business plans too.
ReplyDeleteOh wow, I love your blog too! My friend sent me a link a couple of months ago and I've been enjoying your posts :) Definitely have a go with the kombu bread, it's lovely.
ReplyDelete